


SATAII150 and SATA300 TX Series Quick Start Guide
4
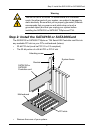
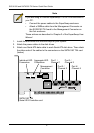
5. Remove the inside slot cover of an available 32-bit PCI slot on the
motherboard.Install the SATAII150 or SATA300 card into the open PCI slot.
Secure the bracket to the system's frame.
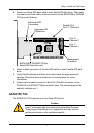
6. Attach your system case's 2- or 4-pin LED cable to the LED connector on the
SATAII150 or SATA300 card (see Install the Disk Drives, below). Make sure
that pin 1 on the connector is aligned with pin 1 of the cable.
7. Fasten the controller card bracket to the system case.
Step 3: Install the Disk Drives
SATAII150 or SATA300 TX2plus
The SATAII150 or SATA300 TX2plus supports up to two Serial ATA drives and up
to two Parallel ATA drives.
1. Install the disk drives into the drive bays of your system.
2. Attach the power cables to the disk drives.
Note
The SATAII150 or SATA300 TX2plus and TX4 Controllers are PCI
Plug-n-Play (PnP) devices. No changes are necessary in the
Motherboard CMOS Setup for resources or drive types in most
applications.
Caution
Use of removable disk drive enclosures other than Promise
Technology's SuperSwap is not supported and may result in
performance loss or other undesired results.
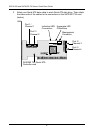
Note
If you are using a Promise SuperSwap 1100 or 4100 enclosure in
your PC:
• Connect the power cables to the SuperSwap enclosure.
• Attach a SMBus cable from the Management Connector on
the SATAII150 or SATA300 TX2plus card to the Management
Connector on the first enclosure
These actions are described in Chapter 2 of the SuperSwap User
Manual.