6 – Removal/Replacement
Transceiver Removal and Replacement
6-2 59265-00 A
S
Transceiver Removal and Replacement
The SFP and XPAK transceivers can be removed and replaced while the switch is
operating without damaging the switch or the transceiver. However, transmission
on the affected port will be interrupted until the transceiver installed.
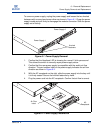
To remove a transceiver, gently press the transceiver into the port to release the
tension, then pull on the release tab or lever and remove the transceiver. Different
transceiver manufacturers have different release mechanisms. Consult the
documentation for your transceiver. To install, insert the transceiver into the port
and gently press until it snaps in place.
Power Supply Removal and Replacement
The power supplies are hot pluggable. This means you can remove or install one
of the power supplies while the switch is operating without disrupting service. The
power supplies are also interchangeable; that is, the left and right power supplies
are the same unit.
When removing or replacing a power supply, consider the following:
The left and right power supplies are interchangeable. However, you must
orient the power supply so that AC receptacle is on the right.
Both power supplies must have the same air flow direction. The part number
label on the power supply indicates the air flow direction.
When removing or replacing a power supply on an operating switch, be sure
the Heartbeat LED is showing the normal 1 blink per second. This allows the
switch to correctly report power supply status.
NOTE:
The SFP and XPAK transceivers will fit only one way. If the transceiver does
not install under gentle pressure, flip it over and try again.
CAUTION!
Both power supplies must have the same air flow direction to prevent the
switch from overheating.
To avoid overheating, do not operate the switch with one power supply
any longer than necessary.


