


A – Command Line Interface
Hotswap Command
59048-01 A A-13
Hotswap Command
This command prompts you step-by-step through the procedure to replace an I/O
blade, insert an I/O blade, or remove an I/O blade while the switch is running.
Authority Admin
Syntax hotswap
Notes The Hotswap command automatically starts and ends an Admin session in the
presence of admin authority.
Always perform the hot swap procedure as prompted, otherwise the switch will
become unresponsive. For example, if you install a blade in the wrong slot,
proceed as though you no mistake had been made and follow the rest of the
procedures. When complete, perform the operation again with the correct slot. If
the switch becomes unresponsive, you must power cycle the switch.
After you select an I/O blade to remove and press the Enter key, all Port Status
LEDs will flash green to identify the selected I/O blade.
After you install an I/O blade and press the Enter key, the Port Status LEDs will
flash amber in sequence by port number, then the Port Status LEDs will flash
green.
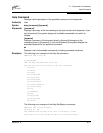
Examples The following is an example of the Hotswap Replace command:
SANbox2-64> hotswap
This command will guide you through the hotswap process. If this process is not
followed exactly, then a seamless transition cannot be guaranteed and a switch
power cycle will be required.
The following procedures may be performed:
1) Replace installed IO blade
2) Insert an IO blade
3) Remove an IO blade
4) Exit this process
Which procedure above do you want to initiate?
(1-4): [4] 1
Which IO blade (indexed by slot number) do you want
to replace? (1,2,3,4,6,7,8,9): [1] 6
Are you sure you want to replace the IO blade in slot 6? (y/n): [n] y
Remove all connections from the IO blade in slot 6.
Remove the IO blade in slot 6 from the chassis.
Please confirm that these steps have been accomplished by pressing the ENTER key.
Hotswap IO blade removal sub-procedure successfully
completed.
Do you want to continue with the replacement procedure? (y/n): [n] y
Insert the IO blade into the chassis in slot 6.