


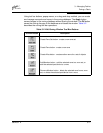

3 – Managing Fabrics
Zoning a Fabric
59048-01 A 3-21
3.4.7
Managing Zones
Managing zones involves the following:
■ Creating a zone in a zone set
■ Adding zone members
■ Renaming a zone or a zone set
■ Removing a zone member
■ Removing a zone from a zone set
■ Removing a zone from all zone sets
■ Changing zone types
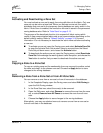
3.4.7.1
Creating a Zone in a Zone Set
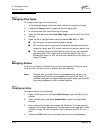
When a zone is created, its zone type is soft. To change the zone type to a hard
zone, refer to ”Changing Zone Types” on page 3-24 for more information. Refer to
”Zones” on page 3-10 for information on zone types (soft and hard). To create a
zone in a zone set, do the following:
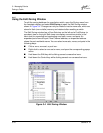
1. Open the Zoning menu, and select Edit Zoning to open the Edit Zoning
window.
2. Open the Edit menu and select Create a Zone.
3. In the Create a Zone window, enter a name for the new zone, and choose
the OK button. The new zone name is displayed in the Zone Sets window. A
zone name must begin with a letter and be no longer than 64 characters.
Valid characters are 0-9, A-Z, a-z, _, and -.
Note: Changes that you make to the zoning database are limited to the
managed switch and do not propagate to the rest of the fabric. To
distribute changes to configured zone sets fabric wide, you must edit
the zoning databases on the individual switches.
Note: If you enter the name of a zone that already exists in the
database, the SANbox Manager application will create a copy of
that zone and its membership in the zone set.