


7
4-4 Loading the Sheet — SETUP Key
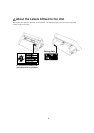
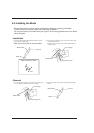
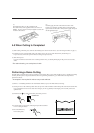
• Turning on the Power
* When the power switch is pressed to turn on the unit, the tool carriage moves. Take care
to ensure that your hands or other objects do not become caught in the moving parts.
When turning the power to the unit off and then on again, wait at least 10 seconds after
switching the power off before switching it back on.
Switch on the power switch on the left side of the PNC-900.
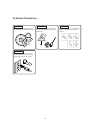
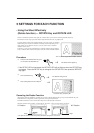
• Loading the Sheet
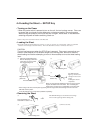
Sheets with a width (horizontal dimension) of 50 mm (1-15/16") to 305 mm (12") can be loaded. There is no particular
restriction on sheet length (vertical dimension). This means that either cut sheets or roll sheets can be used.
CAUTION
The tool carriage moves when the SETUP key is pressed. Take care to ensure that your
hands or other objects do not become caught in the moving parts. Be sure to raise the
sheet loading lever before attempting to move it. Never attempt to force the sheet loading
lever.
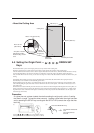
(1)
Raise
Sheet loading lever
(3)
PAUSE
Press the
SETUP key
The SETUP LED
lights up and the tool
carriage moves to the
origin.
Loading the sheet is
completed.
→
(2)
Lower
Sheet loading lever
(3) Remove the sheet.
(2)
Sheet
Inner side of the sheet
Align with the
guide lines
Pinch roller
Move the sheet loading lever
Before attempting to move the
pinch roller, be sure to lower
the sheet loading lever.
Press the SETUP key
Hold down for about 1 sec.
SETUP
→
The SETUP LED goes out and the tool carriage
moves to the right edge of the cutting area.
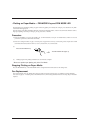
• Removing the Sheet
(1)
* When using a roll sheet, load in place by passing the front edge of the sheet through from the rear of the
PNC-900 over the platen.
It may be helpful to use a sheet base (available separately).
When you have finished loading the sheet, be sure to set the
origin to the bottom left of the sheet. See "4-5 Setting the
Origin Point" on page 8 for an explanation of how to do this.