


Operation
42 Runco CL-810 Series Owner’s Operating Manual
PRE
L
IMINAR
Y
PIP/PBP Set Up: Select PIP/PBP Set Up from the Option menu to change the PIP/PBP
settings.
• PIP/PBP Enable: Press the or button to select PIP/PBP Enable, then press
ENTER. Press the or button to select Off or On, then press ENTER.
• PIP Set Up: Press the or button to select PIP Set Up, then press ENTER. Press
the or button to select PIP Off, Graphic in Video or Video in Graphic, then press
ENTER.
• PBP Set Up: Press the or button arrows to select PBP Set Up, then press
ENTER. Press the or button to select PBP Off, Graphic by Video or Video by
Graphic, then press ENTER.
DNR: Use the or button to adjust the Digital Noise Reduction (DNR). DNR is useful
for clearing up noisy images from interlaced SD sources. Adjust as desired, keeping in
mind that reducing noise (which reduces high frequencies) may also soften the image.
Set Up To access advanced picture quality adjustments, use the up- or down-arrow keys to
highlight Set Up and press ENTER. Use the number buttons on the remote to enter the
Set Up menu passcode when prompted and press ENTER again. Then, press MENU on
the remote control.
White Balance: To remove any trace of color from the white areas of the projected
image, choose White Balance from the Set Up menu and press ENTER.
• Gamma: “Gamma” is a global setting that determines how gray shades are displayed
between minimum input (black) and maximum input (white) for all signals. A good
gamma setting helps to optimize blacks and whites while ensuring smooth transitions
for the “in-between” values utilized in other grays. Unlike “Brightness” and “Contrast”
controls, the overall tone of your images can be lightened or darkened without
changing the extremes and all images will be more vibrant while still showing good
detail in dark areas.
In all but the most unusual situations, the appropriate “Gamma Selection” (see below)
will produce accurate colors and a satisfying contrast level. However, it is sometimes
necessary to adjust the red, blue and green gamma curves individually. To do this,
select Gamma from the White Balance sub-menu and use the left- and right-arrow
buttons to manipulate the on-screen slidebars.
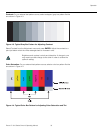
•Gain: Use the Gain controls to correct color imbalances in the bright areas of the
image. A good way to do this is to use a test pattern consisting mostly of solid white
areas, such as an 80 IRE “window” pattern. If the white areas contain traces of red,
green or blue, decrease the Gain for that color.
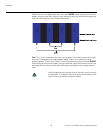
• Offset: Use the Offset controls in the White Balance sub-menu to correct color
imbalances in the dark areas of the image. A good way to do this is to use a test
pattern consisting mostly of dark gray areas, such as a 30 IRE “window” pattern. If the
gray areas contain traces of red, green or blue, decrease the Offset for that color.
• Store Color Temp.4/Store Color Temp.5: When you are finished adjusting the o Ga Gaooainainfayet,toseo18.7349 0 8 T0-0.0004 Tc-0.2003 Twlor Temp(n )-6( 4/Store(e)-5.o(l)2(Color Tem59( 8(stl)3.Store )(o)-8.7349 2 -1.2048 TD-0.0004 Tc-0.0005 Twy( o)-4.u( r)-4. 9(sea)-5.6(t)0.4(g o)-4.5(s)-1.(n. )-T( o)-4.4( r)-4.7(e)0.cre)-5.5(a)0.ll8( th)-0.6m(d)-4.7(e )-6(sea)-5.8( th)-0.6re(e7-5.2(o)4.3(lo)-6lorlo)-65(e)-5.m” p)-4.6(er)-4.asea roe o rIf tce