


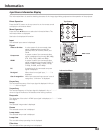


51
Troubleshooting
Before calling your dealer or service center for assistance, check the items below once again.
– Make sure you have properly connected the projector to peripheral equipment as described in “Connecting to Video
Equipment” and “Connecting to a Computer” on pages 15 – 16.
– Make sure all equipment is connected to an AC outlet and the power is turned on.
– When you operate the projector with a computer and it does not project an image, restart the computer.
– Solutions
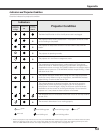
Problem:
No power.
– Plug the power cord of the projector into an AC outlet.
– See if the automatic slide shutter is only half-open. When it is half-open, the POWER
indicator blinks orange and the projector cannot be turned on (see page 18).
– See if the Main On/Off switch is on.
– Wait 90 seconds after the projector is turned off to restart the projector. The
projector can be turned on after the POWER indicator turns red (see page 19).
– Check the WARNING indicator. If the WARNING indicator lights red, the projector
cannot be turned on (see page 44).
– Check the projection lamp (see page 49).
– Check if the projector is installed on a flat surface.
Image is out of focus.
– Adjust the focus of the projector (see page 22).
– Provide proper distance between the projector and the projection screen
(see page 13).
– Check the projection lens to see if it needs cleaning (see page 48).
– Moving the projector from a cool to warm place may result in moisture condensation
on the projection lens. If this occurs, leave the projector off and wait until
condensation evaporates.
– Projecting from the excessive slant angle to the screen may cause keystone
distortion and partial imperfect focus (see page 14).
No image.
– Check the connection between your computer or video equipment and the projector
(see pages 15 – 16).
– See if the input signal is correctly output from your computer. For some laptop
computers, the setting for the monitor output needs to be changed when
connecting to a projector. See your computer’s instruction manual for the setting.
– It takes about 20 seconds to display an image after turning on the projector.
– See if the selected system is corresponding to your computer or video equipment
(see pages 24 – 26).
– Select a correct input source once again through Menu operation
(see pages 25 – 26).
– Make sure the temperature is not out of the specified operating temperature (41°F
– 95°F [5°C – 35°C]).
– When “No show” is operating, the image cannot be displayed. Press the NO SHOW
button or any other button on the remote control (see page 23).
– When “Cleaning” is operating, the image cannot be displayed. Press any button on
the top control or on the remote control (see page 42).
Appendix
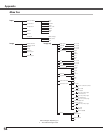
The initial display is not shown.
– Make sure “Off” or “Countdown Off” are not chosen at Display function (see page
40).
The initial display is not same with
the default one.
– Make sure “User” or “Off” are not chosen at Logo function (see page 40).
Filter warning icon appears during
turning on the projector or switching
the input source.
– Check the air filter (see pages 42, 47).
Picture is not bright enough.
– Check if “Contrast” or “Brightness” are adjusted properly (see page 28).
– Check if “Image mode” is selected properly (see page 27).
– Check the LAMP REPLACE indicator. If it lights, the end of lamp life is approaching.
Replace the lamp with a new one promptly. (see pages 49-50, 53).
– Check the Lamp control function (see pages 23, 29).
Lens Shift does not work.
– Release the Lens Shift Lock (see page 14).