


9
ProSEAL
®
44 Pouch Board Laminator
MOUNTING USING A ProSEAL MOUNTING BOARD
Using a ProSEAL Mounting Board
Refer to the instruction sheet packed with each
box of ProSEAL Mounting Boards for specific
information on mounting with a ProSEAL Board.
Also, refer to the instruction sheet for
information on Compatible Media, Process
Conditions and technical information.
Place the image to be mounted on the adhesive-
coated side of the mounting board (dull side of
the board).
Cover your print with the "cover sheet" as
marked (included with each box of ProSEAL
Mounting Boards). Please be sure that the
board is completely covered by this sheet.
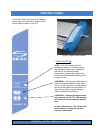
Set the Nip knob to the correct setting that
matches the Mounting Board thickness.
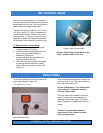
Insert the board into the inlet opening. Ensure
the board will enter centered and straight. A
gentle push may be required to start the board
into the laminator.
Hold the edges of the board until it is engaged in
the unit and the laminator begins pulling it on its
own.
The board will feed through the laminator and
automatically exit at the rear of the unit.
CAUTION! The board will be hot! Allow it
to lie flat while cooling.
CAUTION! USE ONLY WITH ProSEAL
MOUNTING BOARDS 1/4" (6mm) THICK OR
LESS. DO NOT USE PLYWOOD, METAL,
CARDBOARD, SHARP OR HARD BOARD
WITH RAGGED EDGES OR ANY TYPE OF
PLASTIC. MAKE SURE THAT ALL MEDIA
FED INTO THE LAMINATOR IS FREE OF
STAPLES, PAPER CLIPS, OR OTHER HARD
OBJECTS.
Foam board may be cut or trimmed using a
sharp hobby knife such as an X-ACTO Knife.
Lightly score the paper first. Several passes of
the knife may be required.
NOTE: Ragged cuts or pulling of the foam
board indicates a dull blade.