


31
6
Copier trouble?
6
COPIER TROUBLE?
This chapter describes misfeed removal and troubleshooting.
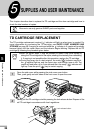
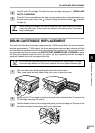
MISFEED REMOVAL
When the misfeed ( ) indicator blinks or blinks in the display, the copier will stop because
of a misfeed.
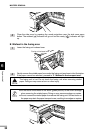
1
Open the side cover while pressing the side cover open button.
2
Check the misfeed location. Remove the misfed paper following the instructions for
each location in the illustration below.
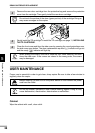
If blinks in the display, proceed to “A Misfeed in the paper feed area”. (p. 31)
If paper is misfed here, proceed to “A
Misfeed in the paper feed area”. (p. 31)
If the misfed paper is seen from
this side, proceed to “C Misfeed in
the transport area”. (p. 33)
If paper is misfed here, proceed to “B
Misfeed in the fusing area”. (p. 32)
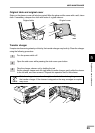
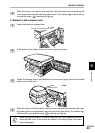
A Misfeed in the paper feed area
1
Gently remove the misfed paper from the paper feed area as shown in the illustration.
When blinks in the display and the misfed paper is not seen from the paper feed
area, pull out the paper tray and remove the misfed paper. If the paper cannot be
removed, proceed to “B Misfeed in the fusing area”.
The fusing unit is hot. Do not touch the fusing unit when removing misfed
paper. Doing so may cause a burn or other injury.
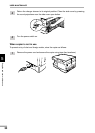
●
Do not touch the surface of the drum (green portion) of the drum cartridge
when removing the misfed paper. Doing so may damage the drum and cause
smudges on copies.
●
If the paper has been fed through the manual bypass, do not remove the
misfed paper through the manual bypass. Toner on the paper may stain the
paper transport area, resulting in smudges on copies.