


50
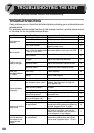
This chapter describes misfeed removal and troubleshooting.
TROUBLESHOOTING
If any problem occurs, check the list below before contacting your authorised service
representative.
For problems with the printer function or the scanner function, see the online manual
or the Help file for the printer/scanner driver.
Problem Possible cause Solution Page
Unit does not
operate.
Unit plugged in? Plug the unit into a grounded outlet. 13
Power switch on? Turn the power switch on. 13
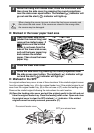
Side cover closed securely? Gently close the side cover. 47
Front cover closed?
Gently close the front cover and then
close the side cover.
47
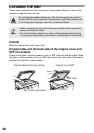
Blank copies
Is the original placed face
down on the document glass
or face up in the SPF?
Place the original face down on the
document glass or face up in the SPF. 15
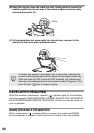
Is the scan head locking
switch locked?
Unlock the scan head locking switch.
57
Copies are too
dark or too light.
Is original image too dark or
too light?
Adjust the exposure manually. 17
Is the unit in the automatic
exposure mode?
Adjust the automatic exposure level. 18
Is the unit in the photo
exposure mode?
Cancel the photo exposure mode. 17
Dust, dirt,
smudges appear
on copies.
Original table or original
cover dirty?
Clean regularly. 48
Original smudged or
blotchy?
Use a clean original. –
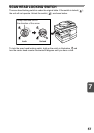
Striped copies Is transfer charger clean? Clean the transfer charger. 49
Paper misfeeds
frequently.
Non-standard paper used?
Use standard paper. If using special
papers, feed the paper through the
multi-bypass tray.
7
Paper curled or damp?
Store paper flat in the wrapper in a dry
location.
–
Pieces of paper inside unit? Remove all pieces of misfed paper. 52
Paper guides in the paper
tray not set properly?
Set the guides properly depending on
the paper size.
8
Too much paper in the paper
tray or multi-bypass tray ?
Remove excessive paper from the
tray.
8
Images rub off the
copy easily.
Is the paper too heavy? Use paper within the specified range. 7
The fusing temperature is
not appropriate.
In the user programs, set "Fusing
temperature setting when the bypass tray
is used" (program 29) to "2 (High)".
44
Paper damp? Replace with dry paper. If the unit is
not used for long time, remove the
paper from the paper tray and store it
in its wrapper in a dry location.
2
Printing is not
uniform between
the edges of the
paper and the
center.
The fusing temperature is
not appropriate.
In the user programs, set "Fusing
temperature setting when the bypass
tray is used" (program 29) to "1 (Low)".
44
7
TROUBLESHOOTING THE UNIT