


16
MAINTENANCE AND TROUBLESHOOTING
MAINTENANCE AND CLEANING
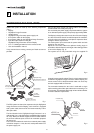
The units in the system do not require internal adjustments
and do not contain any user-serviceable parts.
For replacement of the lamp or any other service requirements
seek qualified technical assistance from your nearest Dealer.
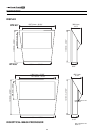
A soft cloth is normally sufficient for cleaning the DigiOptical
Image Processor or the Display. Use a slightly moistened cloth
to remove more stubborn dirt. In this case, before proceeding
switch off and disconnect the unit, and ensure that no liquid
penetrates to the inside.
TROUBLESHOOTING GUIDE
No power (LEDs always OFF)
• Check that the units’ power switches are set to I.
• Check that the power cables are correctly connected to the
units’ power sockets.
• Check the condition of the fuse located on the power socket
on the rear of the Display.
• Replace the fuse located on the display power socket with
an identical type (T 3.15A H).
• If the fuse blows repeatedly, seek technical assistance from
your nearest Dealer.
Lamp fails to switch on
• Allow a few minutes between switching off and switching on
again. This will allow the lamp to cool down sufficiently.
• If the lamp fails to illuminate - even though the unit has had
time to cool down - seek technical assistance from your
nearest Dealer.
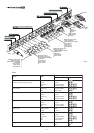
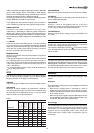
• Check the state of the connection by interpreting the code
displayed by the system LEDs in accordance with Table 3.
No picture
• Check that the selected input is effectively connected to an
active video or graphic source.
• Make sure the video or graphic signals supplied by the
source are compatible with the technical specifications of
the RTX system or, in particular, the selected input.
• Check the condition of the cables used to connect the
DigiOptical Image Processor to the various sources.
• Check the state of the connection between the DigiOptical
Image Processor and the Display.
Picture is disturbed, unstable or noisy
• Check compatibility of the video or graphic signals with the
technical specifications of the system, and specifically, with
the specifications of the selected input.
• Check the condition of the cables used to connect the
DigiOptical Image Processor to the various sources.
• If the problem occurs on a terrestrial broadcast source signal,
check that the receiver has been correctly tuned in and that
the aerial system is in good working order.
• If the problem occurs in a video signal from a video-
recorder, ensure that the videotape is an original “first
generation” copy and that VCR mode is active in the
PICTURE menu.
• Adjust the Sharpness parameter in the PICTURE menu
to optimise the projected image.
Image incomplete along borders (vertical or horizontal)
• Check compatibility of the video or graphic signals with the
technical specifications of the system, and specifically, with
the specifications of the selected input.
• Recall the automatic image adjustment function by
pressing the AUTO key on the remote control or the Display
keypad.
• Adjust the horizontal or vertical position of the projected
image using the IMAGE ADJUSTMENTS / POSITION menu.
• Adjust the width and height of the image, selecting Aspect
in the IMAGE ADJUSTMENTS / ASPECT menu.
Picture too dark, too pale or unnaturally coloured
• Check compatibility of the video or graphic signals with the
technical specifications of the system, and specifically, with
the specifications of the selected input.
• Adjust the CONTRAST, BRIGHTNESS, COLOUR and
TINT parameters in the PICTURE menu.
• If necessary, adjust COLOR TEMPERATURE and GAMMA
CORRECTION (IMAGE menu).
Graphic image with poor quality vertical detail
• Check compatibility of the video or graphic signals with
the technical specifications of the system, and specifically,
with the specifications of the selected input.
• Press AUTO (on the remote or keypad) to execute automatic
adjustments.
• Adjust FREQUENCY and PHASE parameters in the
IMAGE menu to optimise vertical detail of the projected
image.