


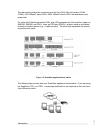

Configuring the SnapGear appliance on your network
Below is an overview of the steps in initial setup of the SnapGear appliance on your
network:
1. Apply power to the SnapGear appliance. When the SnapGear appliance is
powered on in factory default mode, it has no LAN IP address. This state is
indicated by all front panel LEDs except Power flashing (except on LITE+ and
LITE2+). The LEDs remain flashing until a LAN IP address is acquired.
Note
If the LEDs on the front of the unit are not initially flashing, try pressing the
Reset/ERASE button on the back panel of the unit. This does not apply to the
LITE+ and LITE2+ models, which do not flash their LEDs. If after doing this all
the LEDs on the front on the unit do not flash, then you may need to contact
customer support.
However, the SnapGear appliance may be acquiring an initial IP address from
another DHCP server on the LAN, causing its LEDs to stop flashing soon after
booting. In this case, the SnapGear Setup Wizard will detect this address, as
detailed in the following steps.
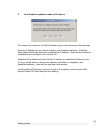
2. Insert the Installation CD into the CD drive of any Windows PC on your network
that meets the system requirements. If the setup program does not run
automatically, select Run from the Start menu and type z:\setup (where z is
the letter of your CD drive).
3. Select the directory and Start menu group where the software utilities for your
SnapGear appliance will be installed.
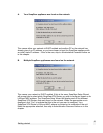
4. The wizard will search the network for your device. If your SnapGear appliance
does not yet have an IP address assigned to it, you will be asked to enter one
now. The next section, Set up an IP address, describes this scenario in more
detail.
Getting started
1
5