


53
Chapter 2 Menu
[C721] SET PROBE ON CURSOR
To perform adjustment, operate the BKM-14L as
follows:
(1) Place the BKM-14L to the cursor displayed on the
bottom left of the screen. ÷ The adjustment
starts. “IN PROGRESS” appears during
adjustment, and the cursor is displayed at the next
adjustment point when the adjustment is
completed.
(2) Move the BKM-14L to the cursor. ÷ The next
adjustment is performed.
In the same way, adjust each adjustment point guided
by the cursor. When the adjustment of all the points is
completed, the screen automatically returns to the
WHITE UNIFORMITY menu (1/2) ([C7]).
To cancel the adjustment
Press the MENU button. The adjusted data is cleared
and the screen returns to the WHITE UNIFORMITY
menu (1/2) ([C7]).
If the BKM-14L is not placed to the cursor
The following message appears, and the cursor moves
to the right and left alternately on the screen.
DO YOU WISH TO ABORT?
LEFT CURSOR: ABORT
RIGHT CURSOR: CONTINUE
To abort, place the BKM-14L to the cursor when it is
displayed on the left. ÷ Returns to [C7].
To continue, place the BKM-14L to the cursor when it
is displayed on the right. ÷ Returns to [C721].
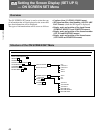
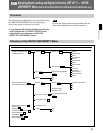
[C73] MANUAL menu
Adjust the gain of R, G and B with the MANUAL
knobs.
The signal format and screen size for the adjustment
are displayed on the top of the screen.
ADJUST... : Adjust the gain. ÷[C731] (It may take
some time to change to the next menu.)
Use appropriate knobs and buttons in each
adjustment as described below.
RED: CONTRAST KNOB: Adjust the R gain
with the CONTRAST knob.
GREEN: BRIGHT KNOB: Adjust the G gain
with the BRIGHT knob.
BLUE: CHROMA KNOB: Adjust the B gain
with the CHROMA knob.
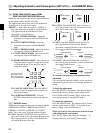
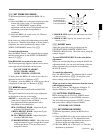
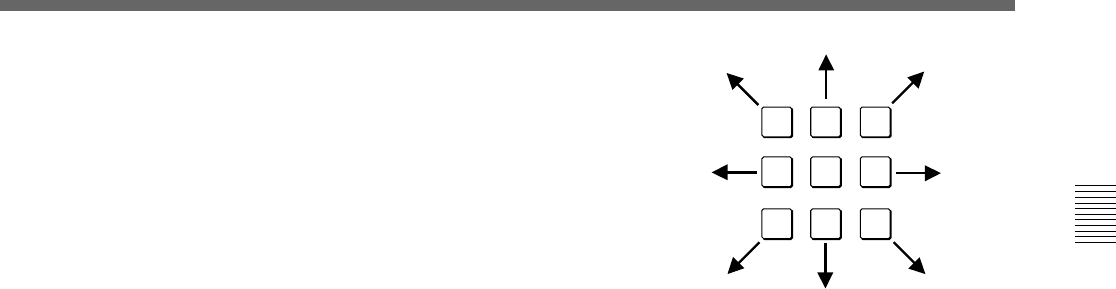
CURSOR POSITION: 10KEY: Move the cursor
using the numeric keypad (except the 5 button)
as illustrated below. Turn on/off the cursor
using the 5 button.
1
2
3
4
5
6
7
8
9
The cursor moves in
the direction of the
arrow corresponding
to the pressed button.
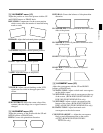
CURSOR H SIZE: Specify the horizontal size of the
cursor (1 to 4).
CURSOR V SIZE: Specify the vertical size of the
cursor (1 to 4).
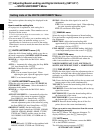
[C731] ADJUST menu
Adjust the gain at the cursor position using the
CONTRAST (RED), BRIGHT (GREEN) and
CHROMA (BLUE) knobs. Move the cursor using the
numeric keypad.
To reset RED/GREEN/BLUE to the value before
adjustment
When you are adjusting the gain using the MANUAL
adjustment knobs, you can reset the setting to the one
before adjustment by pressing the corresponding
MANUAL button.
To cancel the adjustment
Press the MENU button. The adjusted data is cleared
and the screen returns to [C73]. (It may take some
time to change to the previous menu.)
When you want to erase characters from the screen
while adjusting manually
Press the [F1] button. The characters disappear. To
display characters, press the [F1] button again.
[C74] AUTO FULL POINTS menu
Before entering the AUTO FULL POINTS menu,
connect the BKM-14L to the OPTION connector.
The following message appears.÷[C741] (It may
take some time to change to the next menu.)
SET PROBE ON CURSOR
[C741] SET PROBE ON CURSOR
To perform adjustment, operate the BKM-14L as
follows:
(1) Place the BKM-14L to the cursor displayed in the
center of the screen. ÷ The adjustment starts.
When the adjustment is completed, the cursor is
displayed at the next adjustment point.
(2) Move the BKM-14L to the cursor. ÷ The next
adjustment is performed.
(continued)