


27
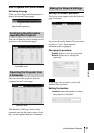
The INSTALL SETTING Menu
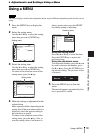
Adjustments and Settings Using a Menu
The INSTALL SETTING Menu
The INSTALL SETTING menu is used for installing the projector.
Items Item descriptions
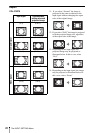
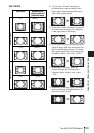
Screen Fitting HV Keystone/ Warping: You can choose how to correct image twist.
V Keystone
*1*5
This is displayed when “HV Keystone” is selected in the “Screen Fitting.”
Auto: The Keystone adjustment is done automatically. If the screen is
tilted, this function may not work properly. In that case, select “Manual”
for Keystone adjustment.
Manual: The higher the setting, the narrower the top of the projected
image. The lower the setting, the narrower the bottom.
H Keystone
*1*5
This is displayed when “HV Keystone” is selected in the “Screen Fitting.”
The higher the setting, the narrower the right part of the projected image.
The lower the setting, the narrower the left part.
Warping This is displayed when “Warping” is selected in the “Screen Fitting”.
Adjust: You can correct image twist.
Reset: You can reset adjusted values back to the default values.
Image Flip HV/H/V/Off: Flips the projected image horizontally and/or vertically
according to the installation method.
Background Black/Blue: Selects the background color of the projected image when no
signal is input.
Lamp Mode Auto/High/Standard: When set to “High,” the image becomes brighter,
and power consumption becomes higher. When set to “Auto,” brightness is
adjusted automatically according to image content. Dark images are
projected with brightness adjusted, leading to energy-saving. Bright images
are projected brightly, without adjusting brightness.
High Altitude
Mode
*2
On/Off: Set to “On” when using the projector at an altitude of 1,500 m or
higher. Continuing to use the wrong setting may affect component
reliability.
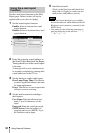
Security Lock
*3
On/Off: This function enables restriction of the projector to authorized
users by password. The setting procedures for security locking are as
follows:
1 Select “On” and press ENTER to display the setting menu.
2 Input the password with the MENU, V/v/B/b, and ENTER keys. (The
default password setting is “ENTER, ENTER, ENTER, ENTER.”)
3 Input a new password with the MENU, V/v/B/b, and ENTER keys.
4 Enter the password again to confirm.
Enter the password when you turn on the projector after disconnecting and
reconnecting the AC power cord.
When it is set to “Off,” you can cancel the security lock. You are required to
input the password again.
If you fail to enter the correct password after three consecutive times, the
projector cannot be used. In this case, press the ?/1 key to go Standby
mode then turn on the power again.
Direct Power On On/Off: When set to “On,” you can turn the power on without going to
Standby mode when the AC power cord is connected to a wall outlet.
Regardless of the Direct Power On setting, you can disconnect the AC
power cord to turn off the power without going to the Standby mode.