


1-4
VPL-HS1
GB
6
Step 1: Installing the Projector
Connections and
Preparations
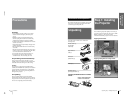
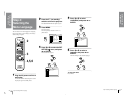
Watching sports, etc. with your company
Viewing images, recorded by a digital
camera and stored in the “Memory Stick,” on
a large screen.
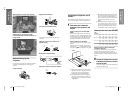
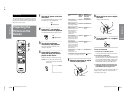
Before Setting Up the
Projector
Do not place the projector in the following situations,
which may cause malfunction or damage to the
projector.
Poorly ventilated
Highly heated and humid
Very dusty and extremely smoky
Do not use the projector under the following
conditions.
Tilting the unit out of the range of the
adjuster setting
Blocking the ventilation holes
Placing the projector without the adjuster
Ventilation
holes
(exhaust)
Ventilation
holes
(intake)
7
GB
Step 1: Installing the Projector
Connections and
Preparations
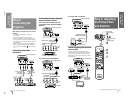
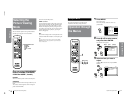
Installing the Projector and a
Screen
The installation distance between the projector and
screen varies depending on the size of the screen.
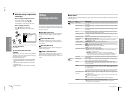
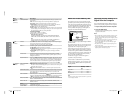
1
Determine the installation
position of the projector and
screen.
When projecting from the side (SIDE
SHOT)
Position the projector with the lens end come
within the area in the illustration, by using
the values a, b, c and d in the table below as a
guide. Align the bottom of the adjuster of the
projector with the bottom end of the screen.
When projecting from the center
You can change the projection angle using the
adjuster.
Position the projector with the lens end come
within the area in the illustration, by using
the values c and d in the table below as a guide.
a: Maximum horizontal distance between the
right/left end of the screen and the center of
the projector’s lens when the projector is
placed on the side (for “SIDE SHOT”)
b: Horizontal distance between the right/left
end of the screen and the center of the lens
when the projector is placed on the side (for
“SIDE SHOT”)
c: Maximum projection distance between the
screen and the center of the projector’s lens
when you use the horizontal distance a, or
when you place the projector with the center
of the screen and the center of the lens
aligned.
d: Minimum projection distance between the
screen and the center of the lens when you
use the horizontal distance b, or when you
place the projector with the center of the
screen and the center of the lens aligned.
Unit: m (feet)
When you project a 720p format signal,
computer’s signal, etc.
The table shows the distances when projecting the
conventional video signals. Distances used for
projecting a 720p format signal, computer’s signal
and data stored in the “Memory Stick” are shown on
page 41.
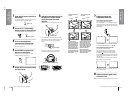
2
Project an image on the screen
and adjust the picture so that it
fits the screen.
To project an image, connect video equipment to
the projector. (1 page 8)
Screen
Projector
a
b
c
d
10°
10°
Screen
size
(inches)
40 60 80 100 120 150
a0.6
(2.0)
0.9
(3.0)
1.2
(3.9)
1.5
(4.9)
1.8
(5.9)
2.3
(7.5)
b0.4
(1.3)
0.6
(2.0)
0.8
(2.6)
1.0
(3.3)
1.2
(3.9)
1.6
(5.2)
c1.7
(5.6)
2.7
(8.9)
3.6
(11.8)
4.5
(14.8)
5.4
(17.7)
6.8
(22.3)
d1.6
(5.2)
2.5
(8.2)
3.3
(10.8)
4.2
(13.8)
5.0
(16.4)
6.3
(20.7)