


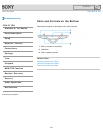
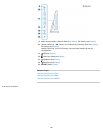


6.
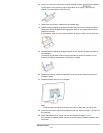
If there is no free slot, remove the currently installed memory module. Pull the latches
in the direction of the arrows to pop up the module at an angle (1), then pull the
module out in the direction of the arrow (2).
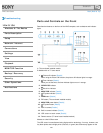
7. Remove the new memory module from its antistatic bag.
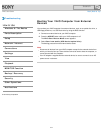
8. Hold the memory module by its edge and slide it into the memory module slot with its
end terminal facing downward while aligning the notch on the module with the small
projection in the slot.
If you intend to install only one memory module, be sure to install it into the lower slot.
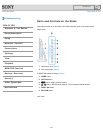
9. Hold the memory module by its edge and push in until it clicks into place as shown in
the illustration.
The latches on both sides of the slot snap into place to secure the module. Do not
touch any ICs (black components) on the memory module.
10. Replace the memory module compartment cover and secure it with the screws you
removed in step 3.
11. Reattach the back panel to your computer.
Note
Insert the tabs of the panel in the slots, and press it down until you hear a click.
12. Connect all connection cables and peripherals that you removed in Step 1, and turn on
the computer.
13. Check that the amount of system memory has correctly changed. [Details]
If the amount of indicated system memory is correct, memory module installation was
successful.
Related Topic
312
Search