


VAIO User Guide Back | Back to Top
Troubleshooting
How to Use
Windows 8: The Basics
Parts Description
Setup
Network / Internet
Connections
Settings
View
Playback
MONITOR Function
Backup / Recovery
Security
Other Operations
Notifications
Operating “Control for HDMI”-Compatible
Equipment
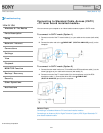
With the “Control for HDMI” function, you can operate “Control for HDMI”-compatible
equipment that is connected to your VAIO computer.
The “Control for HDMI” function helps communication between “Control for HDMI”-
compatible equipment using HDMI CEC (Consumer Electronics Control).
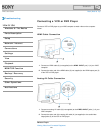
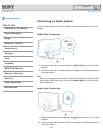
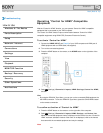
To activate “Control for HDMI”
1. Connect the HDMI INPUT port [Details] of your VAIO computer and HDMI port of
HDMI equipment with an HDMI cable (not supplied).
2. Turn on the connected equipment.
3. Press the HOME button on the remote, or the HOME button on the right side of the
computer.
4. Select (Settings), Channels & Inputs, HDMI Settings, Control for HDMI,
and On.
Hint
By using the “BRAVIA” Sync Menu, you can turn on the connected HDMI equipment via
the HDMI connection. To use the “BRAVIA” Sync Menu, press the SYNC MENU button
on the remote commander.
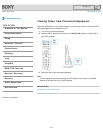
To confirm activation of “Control for HDMI”
1. Press the HOME button on the remote or on the right side of the computer.
2. Select
(Settings), Channels & Inputs, HDMI Settings, and Device List.
When the connected equipment name is displayed on the Device List, then “Control for
HDMI” has been activated. However if the name is not displayed, refer to the manual
that came with the connected equipment and retry the settings.
Note
342
Search