


6-4
A+ SERVER 1022G-URF User's Manual
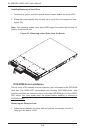
Accessing the Drive Bays
Hard Drives: Because of their hotswap capability, you do not need to access the
inside of the chassis or power down the system to install or replace SATA drives.
Proceed to the next section for instructions.
DVD-ROM Drive: For installing/removing a DVD-ROM drive, you will need to gain
access to the inside of the 1022G-URF by removing the top cover of the chassis.
Proceed to the "DVD-ROM Drive Installation" section later in this chapter for
instructions.
Note: Only a "slim" DVD-ROM drive will t into the 1022G-URF.
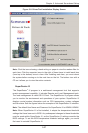
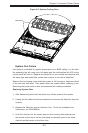
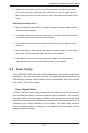
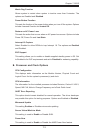
Figure 6-3. Removing the Front Bezel
1. Unlock
2. Press release knob
3. Remove bezel assembly
5. Reposition the fan housing back over the two mounting posts in the chassis,
then reconnect the fan wires to the same chassis fan headers you removed
them from.
6. Power up the system and check that the fan is working properly and that
the LED on the control panel has turned off. Finish by replacing the chassis
cover.
6-4 Drive Bay Installation/Removal
Removing the Front Bezel
If your system has a front bezel (optional) attached to the chassis, you must rst
remove it to gain access to the drive bays. To remove the bezel, rst unlock the
front of the chassis then press the release knob (see Figure 6-3). Carefully remove
the bezel with both hands. A lter located within the bezel can be removed for
replacement/cleaning. It is recommended that you keep a maintenance log of
lter cleaning/replacement, since its condition will affect the airow throughout the
whole system.