


SecurityExpressions Server User Guide
30
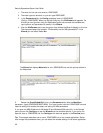
policy. This establishes which users can access this policy and its audit results due to their role. If
a Windows User Group isn't on the local computer, you'll need to enter the group in
domain\groupname
format.
• In the Use Policy field, enter the Windows groups who should be able to modify
the policy.
• In the Remediate field, enter the Windows groups who should be able to
remediate audit results generated using this policy.
• In the View Audit Results field, enter the Windows groups who should be able to
view results from audits using the policy.
To grant all users access, type Everyone. To restrict all users, type None.
12. Click Add Policy to revise the policy settings in the database.
Some policy files display a Policy Configuration box at this point. If the Policy Configuration
box appears, select the configuration settings in the box. Then click Add Policy again.
Now you may base audits on this policy when setting up Audit-on-Connect or Audit-on-Schedule.
Editing Policies
When editing a policy, you can modify any policy characteristics. For example, by clearing the
Make this policy active check mark, that policy no longer applies for the Scope. You could also
change the policy by selecting a previously saved file or uploading a policy file from our Web
site.
Policies are saved to the database. If more than one person is editing the same policy at the
same time, the version saved last is the only version that will be stored.
To edit a policy:
1. In the table at the top of the Policies page, click the Edit hyperlink in the same row as
the policy you want to edit.
The Update settings appear below the table. Make the necessary changes.
2. Select a policy file to associate with the policy using one of the following methods.
• Upload a policy file – Type the name or Browse to transfer a copy of a file from
the console application to the server application. If the SIF file is encrypted, type
a password in the Password box to decrypt it.
• Download this file from the Policy File Library – Transfer a copy of a policy file
from the Policy File Library to the requesting computer by means of a modem or
network. Click the Choose button to display a list of the policy files available in
the library. Click a policy file to select it.
This option is available only if the server can access a Policy File Library.
3. Some policy files display a Policy Configuration box when you select them. If the Policy
Configuration box appears, select the configuration settings in the box.
4. Change the name or optional description of the policy.
5. If you want the policy to be available to use in audits, check the Make this policy
active box.
Clear the check box to make the policy unavailable to use in audits without deleting the
policy.