


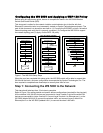

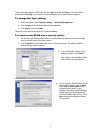


Step 3: Creating a Policy Using the GUI
This step should take less than 15 minutes to complete. When you finish this step, the WS 5000
will be operating with a WEP 128 security policy.
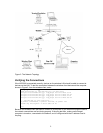
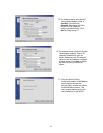
The WS 5000 GUI simplifies creating policies. To use
the GUI, start a web browser on a computer
connected like the computer on the wired LAN in
Figure 2. Direct the browser to the secure connection
at 'https://nnn.nnn.nnn.nnn', (not http://) where
nnn.nnn.nnn.nnn is the IP address of the Ethernet
port 2 on the WS 5000. (In the example in “To
change the Ethernet port 2 IP address:” this IP
address is 192.168.123.102.) The browser should be
able to connect immediately, and display the login
screen as shown here.
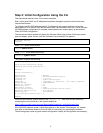
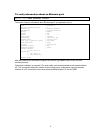
Enter the User ID admin, and Password symbol. (Both are case-sensitive.) Then click the Login
button. The WS 5000 main window appears.
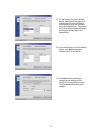
On the left panel of this
main window, notice
that the Default
Wireless Switch Policy
(highlighted) includes a
Default Ethernet Policy,
which applies to both
Ethernet ports, and a
Default Access Port
Policy which applies to
any connected Access
Ports.
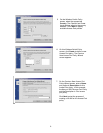
This section will explain how to replace the Default Wireless Switch Policy and the Default Access
Port Policy with a new switch-level WEP 128 policy. (The Default Ethernet Policy does not need
to be changed.) To do this, users will need to create a Security Policy and define a WLAN that will
use this new Security Policy. The policy wizard will guide the user through the procedures.
Basic WS 5000 Configuration
The following steps to enable WEP 128 security for a new ESSID are simple yet powerful. The
WS 5000 GUI can also be used to create a wide variety of complex network policies. Using the
GUI to create these advanced policies requires a thorough understanding of concepts that are
beyond the scope of this document. For a complete explanation of WS 5000 policies, see the
System Reference Guide included on the WS 5000 CD.
6