


36 AS/400 Print Solution — Installation
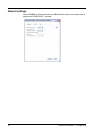
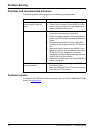
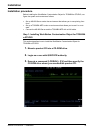
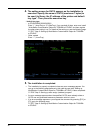
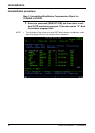
4. The setting screen for OUTQ appears as the installation is
executed. Specify the name of OUTQ (maximum 7 bytes) to
be used, its library, the IP address of the printer and default
tray type*. Then press the execution key.
* default tray type
- e-STUDIO5520C/6520C/6530C
Enter “ I ” (InnerTray) or “S” (SideTray). If you use both of them, enter one, install
“WorkStation Customization Object for TOSHIBA e-STUDIO” and then register
the other when setting it up. For details of the setting up, see the following page:
P.37 "Step 2: Setting up WorkStation Customization Object for TOSHIBA
e-STUDIO"
- Other models
Enter “ I ” (InnerTray).
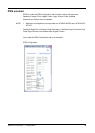
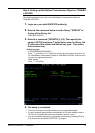
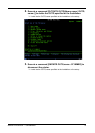
5. The installation is completed.
• The installation is properly completed unless any error messages appear. You
can go to the following page because in this case the next step "Setting up
WorkStation Customization Object for TOSHIBA e-STUDIO" is also completed:
P.38 "Step 3: Starting up auto assign (resident) program"
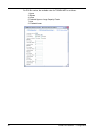
• An error message appears when the specified OUTQ name already exists or
OUTQ was not generated because a parameter value is in error.
• If an error message appears or you stopped the command by pressing [F12] or
[F3], go to the following page:
P.37 "Step 2: Setting up WorkStation Customization Object for TOSHIBA
e-STUDIO"