


2. PRINTER SETUP
ENGLISH VERSION EO1-33047
2.3 Loading the Media
E2- 3
2.3 Loading the Media
The following procedure shows the steps to properly load the media into
the printer so that it feeds straight and true through the printer.
Use the same procedure when replacing the media, also.
The printer prints both labels and tags.
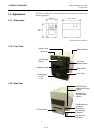
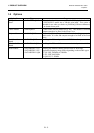
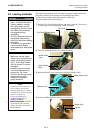
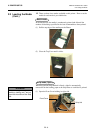
1. Press the Top Cover Release Button and gently open the Top Cover to
its fully open position supporting it with your hand.
2. Take out the Media Holder Ass’y from the printer.
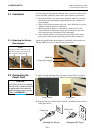
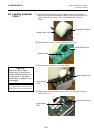
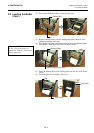
3. Raise the Release Lever and remove the Media Holder (Left).
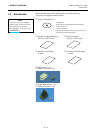
4. Insert the Media Shaft into the core of a media roll.
1. Do not touch any moving
parts. To reduce the risk of
fingers, jewellery, clothing,
etc., being drawn into the
moving parts, be sure to load
the media once the printer
has stopped moving
completely.
2. The Print Head becomes hot
immediately after printing.
A
llow it to cool before loading
the media.
3. To avoid injury, be careful
not to trap your fingers
while opening or closing the
cover.
WARNING!
CAUTION!
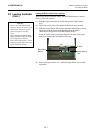
1. Make sure that the Upper
Sensor Ass’y is closed when
taking out the Media Holder
Ass’y. If the Upper Sensor
Ass’y is opened, it may be
damaged.
2. Be careful not to touch the
Print Head Element when
opening the Top Cover.
Failure to do this may cause
missing dots by static
electricity or other print
quality problems.
Media Holder (Left)
Release Lever
Media Holder
Ass’y
Top Cover
Top Cover Release Button
NOTE:
1. As the Top Cover is heavy, be
sure to support it with your
hand when opening it. Failure
to do this may cause the printer
to fall over backward.
2. For the specification of
available media, refer to
Section 7.1 Media.
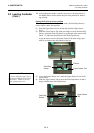
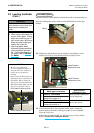
3.
When the inner core diameter
of the media roll is 40 mm,
remove the Spacers from the
Media Holders.
Upper Sensor
Ass’y
Media Shaft
Spacer