


Installation and
connections
CONTENTS
19
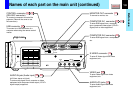
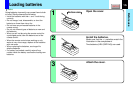
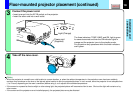
Connect the power cord.
• Insert one end into the AC IN socket on the projector.
• Insert the other end into a wall outlet.
Notes
• When the projector is moved from a cold location to a warm location, or when the ambient temperature in the projection room has risen suddenly,
moisture may condense on the lens or the internal optical section to blur the projected pictures. In such a case, leave the projector for an adequate time
(1 to 2 hours, depending on the room’s condition) before using it, so it adjusts to the ambient temperature.
• If the screen is exposed to direct sunlight or other strong light, the projected picture will become too faint to see. Shut out the light with curtains or by
other means.
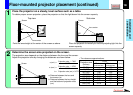
• If the screen and the projector are not installed properly, the projected picture may be distorted.
3
4
Floor-mounted projector placement (continued)
Light (Orange)
ON / STANDBY
F
A
N
T
E
M
P
L
A
M
P
O
N
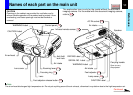
Take off the lens cover.
Power cord
(Supplied)
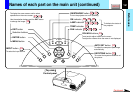
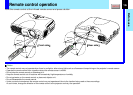
The three indicators, TEMP, LAMP, and ON, light in green
for several seconds and then the ON indicator lights in
orange and the projector turns to the standby mode.
Do not perform any operations while the three indicators
are lit green.