


59
CONTENTS
Document
imaging camera
K
E
Y
S
T
O
N
E
A
U
T
O
S
E
T
E
X
I
T
ON / STANDBY
VOL / ADJ
E
N
T
E
R
M
E
N
U
I
N
P
U
T
F
A
N
T
E
M
P
L
A
M
P
O
N
2
3
OVERLAY
CAMERA
ARM LIGHT
LOCK
W.BALANCE
CAMERA
GAIN
2
MENU
ON/STANDBYINPUT
L-CLICK R-CLICK
ENTER
KEYSTONE
AUTO
SET
EXIT
PIP
FREEZE
MUTECALL
RESIZE
VOLUME/ADJUST
LASER
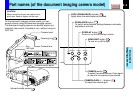
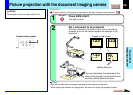
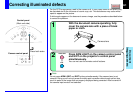
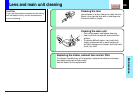
You can draw figures or write with a pen on
the picture of RGB input or video input, by
using the overlay function.
Remote control
Control panel
(Main unit side)
Camera control panel
Preparation
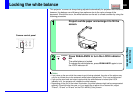
1
Project a picture on the screen as explained in the step “Picture projection with the document
imaging camera”.
56
2
Prepare white paper and a red or blue pen.
Set the white paper on a flat surface
and set the camera so that the paper
is projected onto the screen.
Adjust the camera to make the white paper be
projected on the wholescreen.
1
S
T
O
R
E
C
A
M
E
R
A
A
R
M
L
I
G
H
T
L
O
C
K
W
.
B
A
L
A
N
C
E
G
A
I
N
F
O
C
U
S
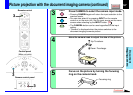
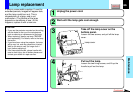
Select the input source using the overlay
function by pressing INPUT.
Select an input source other than the camera input.
2
INPUT
INPUT
Press OVERLAY.
3
OVERLAY
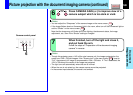
Draw any line on the paper with a red or
blue pen.
A drawn line is projected on the screen, overlapped
with the picture of the input source.
The position of a pen point can be confirmed on the
screen before drawing anything.
4
RGB picture
Screen
Paper
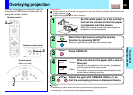
Overlaying projection
Notes
• Handwriting in colors other than blue or red cannot be displayed properly.
• Handwriting in fine lines may not be displayed properly.
Adjust the gain with CAMERA GAIN (+/
-
) so
that the overlaying picture is displayed clearly.
5
CAMERA
GAIN