


Appendix A Command Set Reference
Trango Broadband Wireless — Atlas5010 page 39
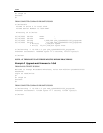
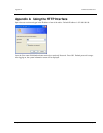
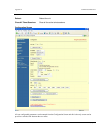
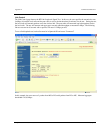
Configuration Screen – Minimum Required Settings to Establish a Wireless Link
To configure a wireless link, user must (at a minimum) enter the following information:
Unit Type: Set one radio as the MU and one radio as the RU. Click on “Change Unit Type” to save the
setting.
IP Configuration: Each radio should be set up with a unique IP address to enable remote management. Click on
“Change IP Config” to save the setting.
Default Opmode: Should be “On”. Radio will enter default opmode approximately 30 seconds after complete
reboot cycle. Opmode must be “On” for radios to transmit and wirelessly connect.
Peer ID: Enter the last 8 digits of the peer units MAC address. Atlas radios will only wirelessly
connect to the peer ID with the specified MAC address.
Active Channel: Select a channel & antenna polarization. Both MU and RU should be set to the same channel
unless RU’s “Auto Scan Master Unit Signal Enable” is enabled. If Auto Scan is enabled, the
RU will automatically scan all channels and polarizations searching for it’s peer MU. Once
the MU is detected, the RU will automatically set its active channel and antenna polarization
to that of the MU.
Click “Save and Activate Settings” to save settings.
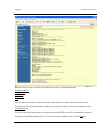
If all settings are entered correctly, and if radios are within operating range – the MU and RU will automatically
wirelessly connect and Ethernet traffic will begin to pass across the wireless link.
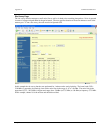
To verify connection status, refer to the System Information page. Status of “connected” in section 2 of the system
information screen will indicate that a wireless link is established between MU and RU. Connection status can also be
viewed in the left-hand margin portion of all HTTP screens. Signal strength (RSSI) received from the peer radio is also
provided on this screen.