


Release 2.1 43
Section 3. Operation
Overview
Once you have installed the power supply and connected both the AC input power
and the load as explained in Section 2, the power supply is in its default
configuration and is ready for operation.
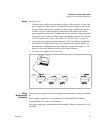
One power supply must be connected via GPIB. Additional units may be controlled
via the CANbus port which enables multichannel addressing. The multichannel
addressing also supports the current sharing feature for parallel-connected units. Any
unit may be toggled between remote and local control modes.
Section 3 provides information about operating the power supply remotely via the
GPIB-M or CAN-only optional interface.
In addition, brief descriptions are provided of Constant Voltage and Constant Current
modes. See “Power Supply Operation” on page 48.
Powering ON
the Power
Supply
To power on the power supply:
1. Ensure that the AC power switch is OFF.
2. Connect the unit to an AC outlet.
3. Turn on the front panel AC power switch.
After a short power-on delay, the digital meters on the front panel and the CV LED
illuminate.
WARNING- Shock Hazard
The factory setting for Power ON is 0V and 0A with the output OFF. These settings
can be customized by end users. If you suspect that the power supply has been used
by someone else since it was received from the factory, be prepared for the unit to
power ON with a live DC output.