


60
PhaserShare Networking Manual
7
TCP/IP Printer Configuration (All Platforms)
7.
The printer calculates the broadcast address based on the IP address and
the network mask. However, the broadcast address can be viewed and set
using the following procedure:
a.
Press ----> until Broadcast Address is displayed.
b.
Press Select; the front panel displays the broadcast address.
c.
Use + and ----> as described in Steps 4d through 4f to set the
broadcast address.
d.
When the broadcast address is set, use Set and Confirm as described
in Steps 4g and 4h to enter the broadcast address into the printer.
8.
Return the printer to normal operation.
a.
Press Exit (the far left button) until the front panel displays Network
Settings.
b.
Press Exit again.
■ If you have changed any parameters that require a printer reset to
take effect, you will be prompted to reset the printer. If you press
Reset, the printer resets. If you press Resume, the front panel
displays Network Settings. Press Exit (the far left button); the
printer returns to normal operation, but the changes you have made
will not take effect until the next time the printer is reset.
■ If you have not changed any parameters that require a printer reset
to take effect, the front panel displays Ready.
Setting IP parameters: Phaser 780 printer front panel
N
O
T
E
When you set the IP addressing parameters from the front panel, the front panel
selections for DHCP/BOOTP and RARP are automatically set to Disabled.
1.
While Ready is displayed, press Select; the Printer menu is displayed:
2.
Press the left or right arrow buttons until the front panel displays Network
Settings.
3.
Press Menu to enter the Network Settings menu; Network Settings
appears on the top line of the display.
4.
If TCP/IP is not already displayed, press the right arrow button until the
front panel displays TCP/IP.
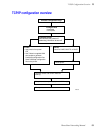
Printer Menu
Help Pages Menu
Printer Menu
Network Settings Menu