


18
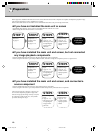
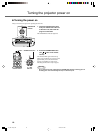
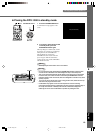
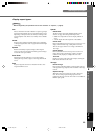
◆ Turning the power on
Always remove the lens cap before operating the main unit.
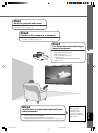
1. Insert the supplied power cable
firmly into the AC inlet at the rear
of the main unit, then insert the
plug into an AC outlet.
The STANDBY/ON indicator lights red.
2. Press the STANDBY/ON button
(the
button on the remote
control).
The indicator blinks green and the lamp
lights up in preparation for projection. After
approximately 35 seconds, the indicator
changes from blinking to steady green,
indicating that the unit is ready to project.
Warning
• Do not remove the power cable while the STANDBY/ON indicator is blinking green or
lit steady green. This could damage the lamp or reduce lamp life.
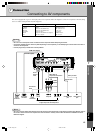
HDMIDVI
G/Y B/P
B
/C
B
R/P
R
/C
R
INPUT A
HD/SYNC
VD
OUT IN
REMOTE
TRIGGER OUT
S-VIDEO VIDEO
INPUT B
RGB/YP
B
P
R
/YC
B
C
R
RS-232C
D4 VIDEO
STANDBY
/
ON
SETTING
LAMP COVER TEMP FAN
PATTERN
ESCAPE
MENU
INPUT
ASPECT
STANDBY/ON
indicator
AC inlet
INPUT
MENU
PATTIRIS
AUTO
SETTING
ASPECT
ZOOM FOCUSV. POS
ESCAPE
STANDBY
/
ON
SETTING
LAMP COVER TEMP FAN
PATTERN
ESCAPE
MENU
INPUT
ASPECT
Remote Control Main unit
button STANDBY/ON button
Turning the projector power on
12_DPX-1300_E.p65 9/20/05, 5:07 PM18