


Zebra S400 & S600 User’s Guide 37
5HLQVWDOOLQJWKH&XWWHU0RGXOH
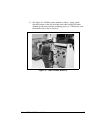
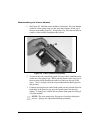
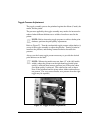
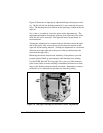
1. See Figure 19. Position the cutter module above the cutter mounting
posts (a). Press down on the cutter module until the mounting slots (b)
engage the mounting posts on the printer.
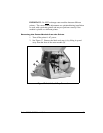
2. See Figure 18. Tighten the mounting screw (b) in a clockwise
direction to hold the cutter module in position.
3. See Figure 18. Position the cutter cable connector (a) so the flat side
of the connector faces away from the printer, then insert it up into the
mating connector on the cutter module.
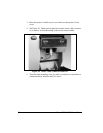
4. Replace the cutter catch tray onto the two mounting posts located on
the front of the cutter module.
7HVWLQJWKH&XWWHU2SHUDWLRQ
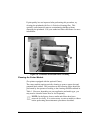
1. If necessary, reload ribbon and label stock into the printer, then close
the printer’s front cover and media access cover.
NOTE: When loading media, make sure the end of the label is
positioned on top of the platen roller, then close the printhead open
lever.
2. When the printer is turned on, the cutter module cycles through one
cutting operation and is then ready to print labels.
3. OPTIONAL: Hold in the PAUSE button while turning on the
printer’s AC power. When the Power-On Self Test begins (all LEDs
on), release the PAUSE button. When the Power-On Self Test ends,
the printer automatically prints test labels that the cutter module
automatically cuts.
/XEULFDWLRQ
CAUTION: No lubricating agents of any kind are required
on this printer. Some commercially available lubricants will
damage the finish if used.