


16
10-Port 100BASE-FX and 20-Port 10/100BASE-TX Fast Ethernet Layer 2 Switching Modules Quick Start Guide
Installing the Module
To install a FEN Switching Module:
1
Before you start the installation process, read and follow the instructions
in “Safety Precautions,” “Handling Precautions,” and “Installation
Prerequisites” earlier in this guide.
2
Select a chassis slot for your module, following the restrictions and
recommendations in “Module Placement in the Chassis” earlier in this
guide.
3
To expose a slot for the module, remove the blank faceplate.
Save this faceplate in case you need it in the future. Empty slots must be
covered to ensure proper airflow and cooling in the chassis.
3Com recommends that you remove the faceplate only for the slot where
you intend to install an individual module; leave the remaining faceplates
in the chassis.
4
Open the module ejector handles.
5
Begin to insert the module:
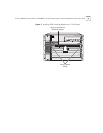
■ In the 7-slot chassis, hold the module horizontally with the LEDs to the
left and begin to insert the module using the guides on the left and
the right of the slot. Figure 2 shows the module position in a 7-slot
chassis.
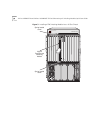
■ In the 8-slot chassis and 16-slot chassis, hold the module vertically
with the LEDs at the top and begin to insert the module using the
guides on the top and the bottom of the slot. Figure 3 shows the
module position in a 16-slot chassis. The module position is the same
in an 8-slot chassis.
CAUTION: Do not twist or bend the module when you insert it.
6
Slide the module into the chassis by pushing firmly on the two ends of
the front panel near the ejector handles.
WARNING: Hazardous energy exists inside the chassis. Do not place
hands or objects into the chassis or touch any components on an inserted
module.