


Using SFP Tranceivers 19
If POST fails, try the following:
■ Power off the Switch, and then power it on again.
Check the Power LED and see if POST was
successfully completed.
■ Reset the Switch. See “Resetting to Factory Defaults”
on page 73.
CAUTION: Resetting the Switch to its factory defaults
erases all your settings. You will need to reconfigure the
Switch after you reset it.
If these do not resolve the issue:
■ Check the 3Com Knowledgebase for a solution. To
visit the 3Com Knowledgebase Web site, start your
Web browser, and then enter
http://knowledgebase.3com.com.
■ Contact your 3Com network supplier for assistance.
Using SFP Tranceivers
The following sections describe how to insert an SFP
transceiver into an SFP slot.
SFP transceivers are hot-insertable and hot-swappable.
You can remove them from and insert them into any
SFP port without having to power down the Switch.
Approved SFP Transceivers
The following list of approved SFP transceivers is correct
at the time of publication:
■ 3CSFP91 SFP (SX)
■ 3CSFP92 SFP (LX)
To access the latest list of approved SFP transceivers for
the Switch on the 3Com Web site, enter this URL into
your Internet browser:
http://www.3com.com
3Com recommends using 3Com SFPs on the Switch. If
you insert an SFP transceiver that is not supported, the
Switch will not recognize it.
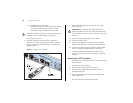
Inserting an SFP Transceiver
To be recognized as valid, the SFP transceiver must have
the following characteristics:
■ 1000BASE-SX or 1000BASE-LX media type:
■ 1000BASE-SX SFP transceiver
Use this transceiver to connect the Switch directly
to a multimode fiber-optic cable.
Off The unit is not receiving power:
■ Verify that the power cord is connected cor-
rectly, and then try powering on the Switch
again
■ If the Switch still does not operate, contact
your 3Com network supplier