


40 CHAPTER 4: TROUBLESHOOTING INSTALLATION PROBLEMS
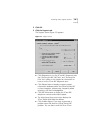
For a description of each test, click the Help button on
the screen or click the question mark (?) at the top of the
screen, move it over the test, and click once. A pop-up box
displays information about the test.
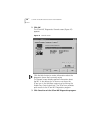
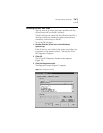
4 Click Start in the Self-Test panel.
A six-test sequence begins. The status of each test (such as
Passed or In Progress) is displayed in the Status column next
to each test as the tests run and are completed.
You can click Stop to stop the tests at any point.
■ If all of the tests are successful, the OfficeConnect NIC
is working correctly.
■ If any test failed, click the question mark (?) at the
top right corner of the screen, move it over the failed
test topic, and click once. A pop-up box displays
information about the test and what to do if it fails.
Running the Echo Test
After you’ve confirmed that the OfficeConnect NIC is
functioning correctly by running the NIC self-tests (as
described in the previous section), verify that the NIC is
transmitting and receiving data over the network by
running the Echo test.
The Echo test checks the ability of the NIC to transmit and
receive data while it’s connected to the network.
To run the Echo test, you need two PCs networked
together.
■ The first PC is used to send data. This is called the
sending PC.
■ The second PC receives data sent from the first PC. This
is called the responding PC.
The two PCs must each have a 3Com OfficeConnect NIC
installed. Also make sure that the network driver is installed.
CAUTION: Running the Echo test while connected to
an active network with more than two computers can
cause intermittent failures within the test. Make sure that
only two computers are connected to the network before
running the Echo test.