


100 CHAPTER 4: USING RF AUTO-TUNING
8 Click Next.
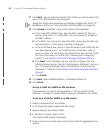
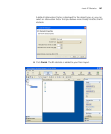
9 Configure the radios:
a To enable the radio, select Enabled.
b In the Radio Profile list, select the profile to which the radio belongs.
c In the Channel Number list, select the channel number for the radio.
If RF Auto-Tuning for channel configuration is enabled, setting this value
has no effect. The channel number is controlled by RF Auto-Tuning.
d In the Transmit Power box, specify the transmit power for the radio.
If RF Auto-Tuning for power configuration is enabled, setting this value
has no effect. The power level is controlled by RF Auto-Tuning.
e If the MAP has two radios, click Next and go to step 9. Otherwise, go
to step 10.
10 Click Finish.
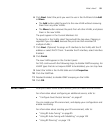
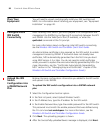
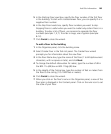
To create a Distributed MAP in3WXM
1 Access the Create Distributed AP wizard:
a Select the Configuration tool bar option.
b In the Organizer panel, click the plus sign next to the WX switch.
c Click the plus sign next to Wireless.
d Select Access Points.
e In the Task List panel, select Distributed AP.
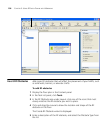
2 In the Name box, type a name (1 to 16 alphanumeric characters, with no
spaces or tabs).
3 In the DAP Number box, specify the connection number for the WX
switch’s connection to this Distributed MAP. The range of valid
connection numbers depends on the WX switch model:
For a WX4400, you can specify a number from 1 to 300.
For a WX1200, you can specify a number from 1 to 30.
For a WXR100, you can specify a number from 1 to 8.
4 In the Serial Number box, type the serial number of the MAP.