


90 CHAPTER 3: CONFIGURING WIRELESS SERVICES
Create a Service Profile for Avaya VoWIP Devices
1 Select Configuration on the toolbar.
2 In the Organizer panel, expand the WX switch.
3 Expand Wireless, then select Wireless Services.
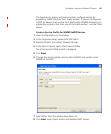
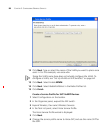
4 In the Task List panel, select Voice Service Profile.
The Voice Service Profile wizard is displayed.
5 Click Next.
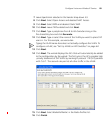
6 Change the service profile name to Voice-Avaya, and use the name Avaya
for the SSID.
7 Select Avaya in the Vendor drop-down list.
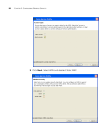
8 Click Next. Select Open Access and deselect MAC Access.
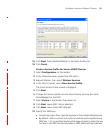
9 Click Next. Select WPA and deselect Static WEP.
10 Click Next. Leave TKIP enabled and click Next.
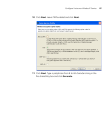
11 Click Next. Type a passphrase from 8 to 63 characters long in the
Pre-shared Key box and click Generate.
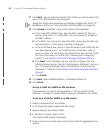
12 Click Next. Type or select the name of the VLAN you want to place Avaya
users in. For this example, use voice-vlan.
Typing the VLAN name here does not actually configure the VLAN. To
configure a VLAN, see “Set Up VLANs on WX Switches” on page 64.
13 Click Next.
14 Click Next. The wizard displays the ACL that will automatically be added
to the configuration by the wizard.