


158 CHAPTER 7: MANAGING AND MONITORING YOUR NETWORK
To immediately install an image on WX switches
1 Select the Devices tool bar option.
2 At the bottom of the Task List panel, select Device Operations.
3 In the Managed Devices list, select the WX switches onto which you want
to install the image.
To select more than one WX, click Shift while clicking to select
contiguous items, or click Ctrl while clicking to select noncontiguous
items.
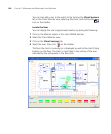
4 In the Task List panel, select Image Install.
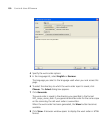
5 Click on Select an Image to display the list of images in the repository.
6 Select the image and click Install.
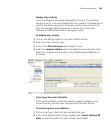
To schedule installation of an image on WX switches
1 Select the Devices tool bar option.
2 At the bottom of the Task List panel, select Device Operations.
3 In the Managed Devices list, select the WX switches onto which you want
to install the image.
To select more than one WX, click Shift while clicking to select
contiguous items, or click Ctrl while clicking to select noncontiguous
items.
4 In the Task List panel, select Schedule Install.
5 Click on Select an Image to display the list of images in the repository.
6 Click Next.
7 Edit the start date and time.
(The date and time are based on the date and time on the machine
where 3WXM Services is installed.)
8 Click Finish.
Saving Versions of
Network Plans
You can save multiple versions of a network plan. After deploying a
network plan to a WX switch, you can save a snapshot of the plan as a
version. Create versions of the network plan on a regular basis and at
every major baseline event for network configurations. Doing so allows
you to have snapshots of network configurations should you need to
revert to one of them.