


3M
™
Multimedia Projector MP7760
14
© 3M IPC 2000
4-2. Standby Mode
When the projector is not being used, place it into standby mode.
1. Press the Standby button.
2. The lamp will switch off and the red LED will illuminate.
Note: The fan motor will continue to run for a few minutes until
the projector cools down and then the fan will turn off.
3. Press the Standby button again to illuminate the lamp and project an image on the screen.
4-3. Projector Power Down
1. Press the Standby button to place the projector in the standby mode (red LED illuminates).
2. Wait until the cooling fan motor cycles off.
Note: Switching the main power off before the fan has cycled
off will decrease the life of the projection lamp.
3. Press the Main Power switch to Off.
4. Turn off the power to your input devices.
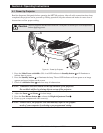
5. Install lens cap to protect projection lens.
6. To transport the projector, disconnect all power and connection cables.
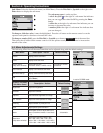
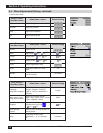
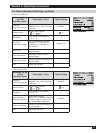
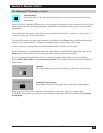
4-4. Using System Menus
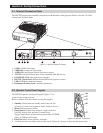
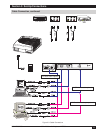
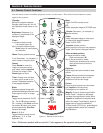
Main Menu: Press the Menu button on the operator touch panel keypad (Figure 3-3) or the remote control
keypad (Figure 5-1) to display the Main Menu.
The menu name is on the top line.
An arrowhead at the right of a menu line indicates that this
item is a sub-menu that can be selected.
A text field at the right of a line indicates that this is a value
that you can change in a drop down window.
Info: Press Enter to display the Info window.
To select a sub-menu, press the Disc Pad or Joystick up or down to highlight (select) the desired sub-menu.
Then press the Disc Pad or Joystick to the right or the Enter button to display the sub-menu (see Sub-Menu).
To change a text field value, press the Disc Pad or Joystick up or down to highlight (select) the menu line.
Then press the Disc Pad or Joystick to the right or the Enter button to display a drop-down window of all the
possible values. Use the Disc Pad or Joystick to select a value and press Enter to initiate the selection.
To exit a sub-menu, press the Disc Pad or Joystick to the left.
To completely exit the menu system and return to the projected image, press the Menu button.
Section 4: Operating Instructions