


Appendix C: SATA RAID configuration utility
108
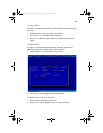
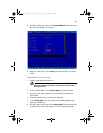
7 Scroll to Stripe Size, by using the <Tab> key, and select 16 KB, 32
KB, or 64 KB using the arrow keys. Press <Enter> to confirm the
array stripe size.
8 Using the <Tab> key, scoll to the Create RAID via field and select.
Migrate. Press <Enter> to continue.
9 With the <Tab> key, scroll to Done, and press <Enter>.
10 Select the Source Drive, and press <Enter> followed by <Y>.
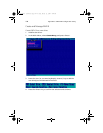
Create RAID 1 from new drives
1 Install new HDD(s) and initalize it/them.
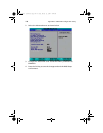
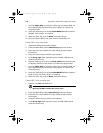
2 From the Main Menu, select Create Array, and press <Enter>.
3 Press the <Ins> key to add to the new drive(s) to the Selected
Drives field.
4 Press the <Enter> key to confirm your selection.
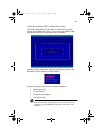
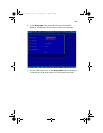
5In the Array Type field, move the cursor to RAID 1(Mirror) and
press the <Enter> key.
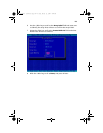
6 Use the <Tab> key to scroll to the Array Label field and enter text
to identify the array. Press <Enter> to confirm the array’s label.
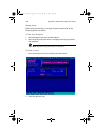
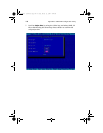
7 Scroll to Stripe Size, by using the <Tab> key, and select 16 KB, 32
KB, or 64 KB using the arrow keys. Press <Enter> to confirm the
array stripe size.
8 Using the <Tab> key, scoll to the Create RAID via field and select.
Clear or Quick Init. Press <Enter> to continue.
9 With the <Tab> key, scroll to Done, and press <Enter>.
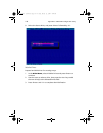
Create RAID 1 from a source drive
1 Install a new HDD and initalize it.
Warning! Do NOT initailize the source drive!
2 From the Main Menu, select Create Array, and press <Enter>.
3 Press the <Ins> key to add to the new drive(s) to the Selected
Drives field.
4 Press the <Enter> key to confirm your selection.
5In the Array Type field, move the cursor to RAID 1(Mirror) and
press the <Enter> key.
BB!S421!.!FO/cppl!!Qbhf!219!!Gsjebz-!Nbsdi!23-!3115!!5;1:!QN