


30
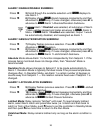
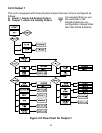
3.2.8 Loop Break Time/Field Calibration
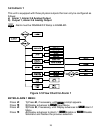
Figure 3.7 Flow Chart for Loop Break Time/Field Calibration
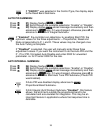
ENTER LOOP BREAK TIME MENU:
Press
a
1) Press
a
, if necessary, until
CNFG
prompt appears.
Press
d
2) Display advances to
INPT
Input Menu.
Press
a
3) Press
a
, if necessary, until Display advances to
LOOP
Loop
Break Time Menu.
Press
d
4) Display advances to Loop Break Time
ENBL
Enable or
DSBL
Disable Submenu and flashes the previous selection.
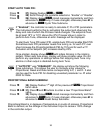
LOOP BREAK ENABLE/DISABLE SUBMENU:
Press b 5) Scroll through the available selections:
ENBL
or
DSBL
.
Press
d
6) Display shows
STRD
stored message momentarily and then
advances to
B.TIM
Loop Break Time Value Submenu.
Loop Break is an additional safety feature intended to monitor the rate of change of the
process value, while approaching the SP1. It is strictly intended as an additional warning
system, therefore its use is entirely optional. An active Loop Break will cause the Process
Value digits to blink in a rotating pattern. If the process value reaches the set point the
blinking will stop and
B.TIM
is completed successfully, otherwise
BR.AL
Break Alarm
warning will flash, and Output 1 will be turned off.
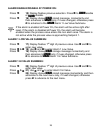
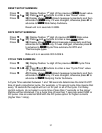
LOOP BREAK TIME VALUE SUBMENU:
Press
d
7) Display flashes 1
st
digit of previous Loop Value.
Press
b
&
c
8)
Press
b
and
c
buttons to enter a new Loop Value
(0 to 99.59).
Press
d
9) Display shows
STRD
stored message momentarily and then
advances to
R.ADJ
Reading Adjust Submenu.
Loop Break Time Value allows the user to determine the time interval in MM:SS (from
zero to 99 minutes and 59 seconds) that the Process Value changes at least 10 counts
or if the Input Type is either RTD or Thermocouple, the value changes 4° Fahrenheit or
2° Celsius. At the specified time interval, if the process value change is less than the
stated rate, flashing
B.TIM
will be displayed, the output 1 will be de-energized, and
Alarm 1 energized. Loop break time will be disabled when the Process Value (PV) enters
the control band.
It is required
that you put
the controller
in the Standby Mode
for any configuration
change other than Set
Points & Alarms.