


31
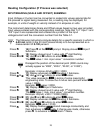
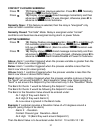
READING ADJUST SUBMENU:
Press
d
10) Display flashes 1
st
digit of previous reading adjust value.
Press
b
&
c
11) Press
b
and
c
buttons to enter a new Reading Adjust value
(-1999 to 9999).
Press
d
12) Display shows
STRD
stored message momentarily and then
advances to
SP.DV
Setpoint Deviation Menu.
Reading Offset Adjust allows the user to fine tune a minor error of the transducer,
however some applications may require a large offset adjust.
(Displayed Process Value = Measured Process Value ± R.ADJ).
Reading Adjust is adjustable between -1999 to 9999. For Temperature reading only, not
Process.
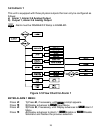
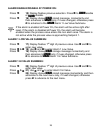
SETPOINT DEVIATION ENABLE/DISABLE SUBMENU:
Press
d
13) Display advances to Setpoint Deviation
ENBL
Enable or
DSBL
Disable Submenu and flashes the previous selection.
Press
b
14) Scroll through the available selections:
ENBL
or
DSBL
.
Press
d
15) Display shows
STRD
stored message momentarily and then
advances to the
CAL1
Menu.
Setpoint Deviation Submenu, if “enabled”, allows changes to Setpoint 1 to be made
automatically to Setpoint 2. This mode is very helpful if the Process Value changes often.
In Setpoint Deviation Mode, set SP2 a certain number of degrees or counts away from
SP1 - this relation remains fixed when SP1 is changed. For instance: Setting SP1=200
and SP2=20 and enabling
SP.DV
means that the absolute value of SP2=20. Moving SP1
to 300, the absolute value of SP2 becomes 320.
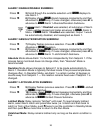
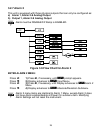
THERMOCOUPLE FIELD CALIBRATION SUBMENU:
RTD and Process are perfectly calibrated. This section is applicable to
Thermocouple (TC) calibration only.
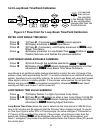
Be sure that the TC being used to calibrate the meter is of the type
selected in the TC submenu. Place the TC in an ice-bath (or other
0°C / 32°F environment). In ambient temperature conditions: connect the
TC to the meter, apply power to the meter.
CAUTION: Do not proceed with TC calibration unless the above conditions
have been in effect for at least one hour.
Press
a
16) Display shows
CAL1
.
Press
d
17) Display shows flashing
0000
.
Press
a
18) Display will still show flashing
0000
.
Press
d
19) Display shows
OUT1
(meaning Calibration is complete)
* If you accidently engage the flashing
0000
(CAL° alert) simply re-press
the last button you pressed, to avoid unintentionally mis-calibrating your meter.
°°
CAUTION: Do not perform the following steps until you fully
understand this entire section.
°°