


Copyright 2002 Agilent Technologies. 10001810-E6701A Tutorial LAN Connection
All Rights Reserved.
Page 18 of 32 Rev. 1.2; Feb. 14, 2002
E6701A Features Using a LAN Connection Between the PC
and Test Set
Verify the following:
Setup has been successfully completed (See previous section Setup)
Test set is on and displays the Call Setup screen.
The wireless device is off.
The PC is started, and displays a compatible browser window.
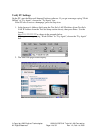
Product Feature: Screen Image Capture
You can retrieve a copy of the Test Set’s current screen.
1. On the PC, on the 8960 Web Control page, select the Get Image icon.
2. This button retrieves a copy of the Test Set’s current screen.
3. Click the image again to capture a new screen (or refresh the image).
Normal Windows functions are available for the image.
4. Save the image by right-clicking the image and using the browser’s "Save Picture As…"
feature. You can choose a GIF or Bitmap file format.
5. To close the image, click the X in the upper-right corner of the window.
Product Feature: Protocol Logging
The E6701A GPRS Lab Application enables the Test Set to log GPRS protocol messages. The
log results are displayed in a web page format. You control which messages are logged by
choosing observation points.
Here are some important points about the log data:
• You are using the PC to access this data, but the data is captured by the test set.
• The data is formatted for the Internet Explorer browser in the PC.
• You cannot view the log data on the Test Set’s display.
• To save this log data, you must store it in the PC’s memory. (You will learn how to do
this in the instructions that follow). There is only one logging memory location in the
Test Set for log data, of about 4 MB size.
• Any time you select Start Logging, any previous data in the test set’s memory
location will be overwritten.
• You can log while using any of the Data Connection Types in the Test Set: IP Data, ETSI
A, ETSI B, or BLER.
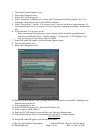
1. On the PC, on the 8960 Web Control page, select the Protocol Logging icon.
2. Select Logging Setup
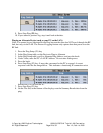
3. Set the Observation Points and Buffer Operation. At least one Observation Point must be
selected.