


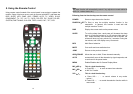


32
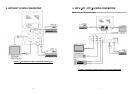
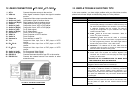
21. DM RS232 QUICK INSTALLATION
Before install DM RS232 V0.9 software, you must to follow the steps
below:
1. Make sure the monitors and computer is turned OFF.
2. Connect the Monitor (COM1/COM2 port) with your computer by DM RS232
V0.9 cable.
Starting Setup
Turn ON the monitor, and turn ON the computer.
Before you can start Setup, the DM RS232 V0.9 software must be installed
and running on each computer with windows operation system.
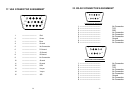
Step 1:
Download the DM RS232 V0.9 driver on ALBATRON Website
(http://www.albatron.com.tw/images/product/ia/high_definition_monitor/softwar
e/rs232.zip).
Step 2:
Extract Zip file to “RS232” sub-directory.
Step 3:
Following the on-screen instructions.
Step 4:
Installation is complete.
Step 5:
Press START and opening up DM RS232 V0.9 page under Program tools
group.
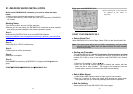
STARTPROGRAMDM RS232 V0.9DM RS232 V0.9
33
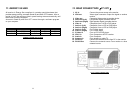
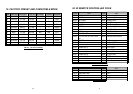
Enjoy your new DM RS232 V0.9!
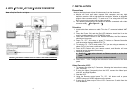
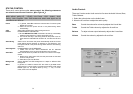
Figure A:DM RS232 V0.9 CONTROL PAGE
START YOUR DM RS232 V0.9
Select Serial Port
Under DM RS232 V0.9 Control Page, Select COM1 on the Select Serial Port.
Note: The select serial will be set on COM1 automatically, and you will be
warning while the COM1 port has been selected by other interface
each time you enter.
Setting an ID number
Through DM RS232 V0.9 (Serial Transmission Communication interface)
to remote control the device. To identify the monitor, you must to set an ID
number (ID=1~99) to each of the monitor under DM RS232 V0.9 Control
page.
1. Select the ID number (1~99) by tab.
2. After you set the ID, choose high/light to identify the monitor with has
been set with a valid number. The monitor will correspond with the
current status, and this could control the OSD function directly.
Select Mate Signal
1. Under Select Mate Signal to select a video signal to each monitor.
2. Wait for 2 seconds to switch the signal while change the Video signal.
The system will give you a warning message while an error operation.
Exit the Setting
Select the Exit tab to quit DM RS232 V0.9 Control page.
★ The version mow is V0.9 and will
b
e updated in the future i
f
necessar
y
.