


x900 Series Switch and SwitchBlade
®
x908
24
Using the AlliedWare Operating System GUI
Follow this procedure to establish a connection to an AT-9900 series switch, so
you can use the GUI to configure the switch.
1. Select a PC to use and identify its subnet.
You can browse to the switch from any PC running a supported operating
system with a supported browser. See Using the Graphical User Interface
(GUI) on AT-9900 Series Switches in the AlliedWare
®
Operating System Software
Reference for a list of supported combinations. JavaScript must be enabled.
While using the GUI, disable any toolbars or plug-ins on your browser that
block pop-ups. The GUI displays detailed configuration options and
information in pop-up windows.
2. Connect the PC to the switch.
Use an Ethernet cable to connect an Ethernet card on the PC to any of the
switch ports. You can browse to the router through any VLAN as long as
you give it an IP address. These instructions assume you are using vlan1. All
switch ports belong to vlan1 by default.
3. Access the CLI from the PC as described in “Using the AlliedWare
Operating System CLI” on page 22.
4. Enable IP.
enable ip
5. Assign the vlan1 interface an IP address in the same subnet as the PC.
add ip interface=vlan1 ip=ipaddress mask=mask
enable http server
6. Save the configuration and set the switch to use it on bootup.
create config=your-name.cfg
set config=your-name.cfg
7. On the PC’s web browser, bypass the HTTP proxy server, if necessary.
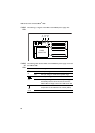
8. Point your web browser at the IP address for vlan1.
9. At the login prompt, enter the user name and password.
User Name: manager
Password: friend
The System Status page is displayed. Select options from the sidebar menu
to configure and manage the switch.
For context-sensitive online help, click the Help button at the top of the
sidebar menu or on any pop-up page.