


Connections
5
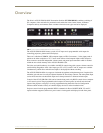
Solecis AVS-SL-PR-0201-0301 Presentation Switcher
Connections
PC Connections
1. Connect the PC sources to the sockets labelled PC 1 & PC 2.
2. Connect the primary output to Output 1 and then if a secondary output is required, connect it to
Output2.
3. Connect the audio sources for the PC inputs to the inputs labelled PC 1 & PC 2 in the audio block.
Video Connections
1. Connect the Composite and S-Video sources to the inputs labelled Video 1, Video 2 & Video 3.
2. Connect the corresponding audio input to it's socket in the audio block.
3. Connect the video display device to either the composite output and/or the S-Video output.
Audio Connections
1. If an auxiliary audio input is required then connect it to the input labelled AUX in the audio block.
2. Connect the audio output to the input of the chosen amplifier or other audio device.
Microphone Connections
The unit comes with an internal 12V supply for use as microphone phantom power. If this is not required
or a separate phantom power supply is required then make sure the phantom power supply switch is set
to the off position.
If a separate phantom power supply is required connect it to the screw terminals labelled Power + and
gnd.
Connect the microphone to the balanced input labelled Mic +, - and gnd.
Balanced Output Connections
If balanced audio output is required connect it to the screw terminals labelled balanced output left &
right, hot & cold and ground.
Make sure the unit is unplugged from the mains power source while making initial
connections.
Do not connect a composite and s-video input to the same input, this may damage
the equipment.
Only the video output should ever have both connections populated.
Make sure the phantom power settings are correct before connecting the microphone
to avoid damage to equipment.
Do not exceed 48v phantom power supply, exceeding this limit may result in fire.