


NetLinx Security and Web Server
84
NetLinx Integrated Controllers
10. Click the down arrow from the Action field to open a drop-down listing of available certificate
generation options.
11. Choose Create Request from the drop-down list.
12. Click OK to accept the information entered into the above fields and generate a certificate file.
Refer to the Security tab - Export Certificate Request page section on page 69.
This refreshes the Server Certificate page and if the certificate request was successful,
displays a "Certified request generated" message.
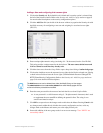
13. Click the Export Certificate Request link (on the left of the browser window) to display the
certificate text file.
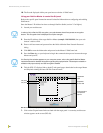
14. Place your cursor within the certificate text field.
15. Press the Ctrl + A keys simultaneously on your keyboard (this selects all the text within the
field).
16. Press the Ctrl + C keys simultaneously on your keyboard (this takes the blue selected text
within the field and copies it to your temporary memory/clipboard).
17. Paste (using Ctrl + V) this text into your e-mail document and then send that information to a
CA with its accompanying certificate application.
18. Once you have received the returned CA certificate, follow the procedures outlined in the
following section to import the returned certificate over a secure connection to the target
Master.
Importing a CA certificate to the Master over a secure SSL connection
Before importing a CA server certificate, you must:
First, have a self-generated certificate installed onto your target Master.
Secondly, enable the SSL security feature from the Enable Security page, to establish a
secure connection to the Master prior to importing the encrypted CA certificate. Refer to
the Security tab - Enable Security page section on page 58 for more information about
enabling SSL security.
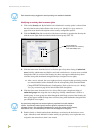
1. Take the returned certificate (signed by the CA and encrypted with new information which
makes it different from the text string that was previously sent) and copy it into your clipboard.
Refer to the Security tab - Import Certificate page section on page 69.
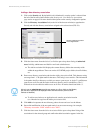
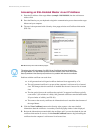
2. Click the Import Certificate link to open the empty Import Certificate window.
3. Place your cursor within the empty window and paste the raw text data (in its entirety) into the
field.
YOU MUST COPY ALL OF THE TEXT within this field, including the -----BEGIN
CERTIFICATE REQUEST----- and the -----END CERTIFICATE REQUEST-----.
Without this text included in the CA submission, you will not receive a CA-approved
certificate.
When a certificate request is generated, you are creating a private key on the Master.
YOU CAN NOT REQUEST ANOTHER CERTIFICATE UNTIL THE PREVIOUS
REQUEST HAS BEEN FULFILLED. Doing so will void any information received from
the previously requested certificate and it will be nonfunctional if you try to use it.