


2-20 Chapter 2: Installation
2.5.1 Conguring the LAN controller
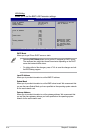
Before you can establish connection to the ASMB3-SOL PLUS board, you must
congure the LAN port for server management used by the remote server to
connect to the local/central server.
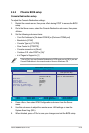
To congure the LAN port of the remote server:
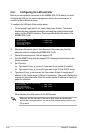
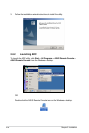
1. On the prompt, type asmc2 -init_asmb, then press <Enter>. The screen
displays the auto-detected information including the system/motherboard
name, and the IPMI2.0 interface. The screen also shows the status of the
ASMB3-SOL PLUS.
c:\dos>asmc2 -init_asmb
Detect System -> DSBF-D/SAS
Detect Motherboard -> (DSBF-D/SAS)
Detect KCS Interface
Initial BMC O.K.
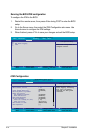
2. Shut down the remote server, then disconnect the power plug from the
electrical socket to initialize the ASMB3-SOL PLUS.
When nished, the utility returns to the DOS prompt.
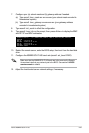
c:\dos>asmc2 -bmc_ip 10.10.10.20
Detect System -> DSBF-D/SAS
Detect Motherboard -> (DSBF-D/SAS)
Detect KCS Interface
New BMC IP : 10.10.10.20
Make sure that the assigned IP address for both remote and local/central
servers are in the same subnet. You can use the network settings utility in your
OS to check.
3. Restart the remote server from the support CD.
4. Run the ASMC2 utility from the support CD following the instructions in the
previous section.
5. Set IP source.
(a) Type asmc2 -bmc_ip_source 1 if you want to set a static IP address.
(b) Type asmc2 -bmc_ip_source 2 if you want to get IP from DHCP server.
6. Type asmc2 -bmc_ip xxx.xxx.xxx.xxx, then press <Enter> to assign any IP
address to the remote server LAN port (if necessary). The screen displays the
request and response buffer. Write the remote server IP address in a piece of
paper for reference.