


2-22-2
2-22-2
2-2
Chapter 2: InstallationChapter 2: Installation
Chapter 2: InstallationChapter 2: Installation
Chapter 2: Installation
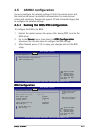
2.2 Hardware installation
To install the server management board:
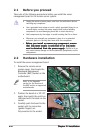
1. Remove the remote server
system cover, then locate the
Baseboard Management
Controller (BMC) socket on the
motherboard.
2.1 Before you proceed
Take note of the following precautions before you install the server
management board to the remote server system.
• Unplug the server system power cord from the wall socket before
touching any component.
• Use a grounded wrist strap or touch a safely grounded object or to
a metal object, such as the power supply case, before handling
components to avoid damaging them due to static electricity.
• Hold components by the edges to avoid touching the ICs on them.
• Whenever you uninstall any component, place it on a grounded
antistatic pad or in the bag that came with the component.
•
Before you install or remove any component, ensureBefore you install or remove any component, ensure
Before you install or remove any component, ensureBefore you install or remove any component, ensure
Before you install or remove any component, ensure
that the power supply is switched off or the powerthat the power supply is switched off or the power
that the power supply is switched off or the powerthat the power supply is switched off or the power
that the power supply is switched off or the power
cord is detached from the power supply. cord is detached from the power supply.
cord is detached from the power supply. cord is detached from the power supply.
cord is detached from the power supply. Failure to do so
may cause severe damage to the motherboard, peripherals, and/or
components.
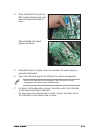
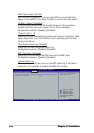
2. Position the board at a 30º-45º
angle, then match the notch on
the board with the break on the
socket.
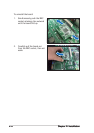
3. Carefully push the board to the
socket until its connectors
(golden fingers) are
fully-inserted to the socket.
Refer to the Appendix
section for the location of
the BMC socket on supported
motherboards.