


3-203-20
3-203-20
3-20
Chapter 3: Software supportChapter 3: Software support
Chapter 3: Software supportChapter 3: Software support
Chapter 3: Software support
Important notice for WindowsImportant notice for Windows
Important notice for WindowsImportant notice for Windows
Important notice for Windows
®®
®®
®
XP (Service Pack 2) users XP (Service Pack 2) users
XP (Service Pack 2) users XP (Service Pack 2) users
XP (Service Pack 2) users
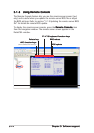
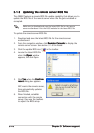
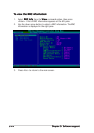
If the remote server system is behind a firewall, you must create a UDP
port to receive PET information.
To create a UDP port:
1. Double-click the
My ComputerMy Computer
My ComputerMy Computer
My Computer icon from the Windows
®
desktop,
then click the
My Network PlacesMy Network Places
My Network PlacesMy Network Places
My Network Places link.
2. Click the
View network connectionsView network connections
View network connectionsView network connections
View network connections link, then select the LAN
connection the remote server system is using.
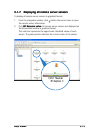
3. Right-click the LAN connection, then select
Properties Properties
Properties Properties
Properties from the
drop-down menu.
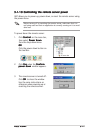
4. Click the
Advanced Advanced
Advanced Advanced
Advanced tab, then click the
Settings Settings
Settings Settings
Settings button.
5. On the
Services Services
Services Services
Services tab, click the
Add Add
Add Add
Add button to display a
ServiceService
ServiceService
Service
Settings Settings
Settings Settings
Settings window.
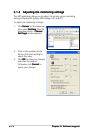
6. Type a name on the
Description of service fieldDescription of service field
Description of service fieldDescription of service field
Description of service field (i.e. ASUS ARC).
7. Type the IP address of the local/central server, then set the
ExternalExternal
ExternalExternal
External
and
Internal Port number Internal Port number
Internal Port number Internal Port number
Internal Port number to
162162
162162
162.
8. Select
UDPUDP
UDPUDP
U D P, then click
OKOK
OKOK
O K. The created service is displayed in the
Services list. Check the box before the service, then click
OKOK
OKOK
OK.
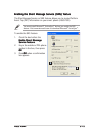
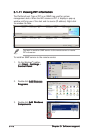
You must also adjust the Internet Explorer settings to allow active contents
to run in the local/central server. To do this:
1. From the
Internet Explorer Internet Explorer
Internet Explorer Internet Explorer
Internet Explorer menu, click
ToolsTools
ToolsTools
Tools, then select
Internet OptionsInternet Options
Internet OptionsInternet Options
Internet Options from the drop-down menu.
2. Click the
Advanced Advanced
Advanced Advanced
Advanced tab.
3. Enable the item “
Allow active content to run in files on My ComputerAllow active content to run in files on My Computer
Allow active content to run in files on My ComputerAllow active content to run in files on My Computer
Allow active content to run in files on My Computer”.
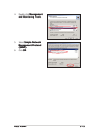
4. Click the
Apply Apply
Apply Apply
Apply button, then click
OK OK
OK OK
O K to close the window.