


ASUS Vintage-PE2ASUS Vintage-PE2
ASUS Vintage-PE2ASUS Vintage-PE2
ASUS Vintage-PE2
2-232-23
2-232-23
2-23
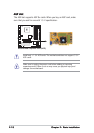
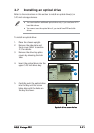
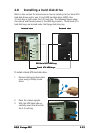
2.8 Installing a hard disk drive
Refer to this section for instructions on how to install up to four Serial ATA
hard disk drives and/or one 3.5-inch IDE hard disk drive (HDD). One
3.5-inch bay is right under the 5.25-inch bay. The following figures show
the internal and external views of the HDD bay location. Three Serial ATA
hard disk bays are located under the floppy disk drive bay.
Internal viewInternal view
Internal viewInternal view
Internal view
External viewExternal view
External viewExternal view
External view
3
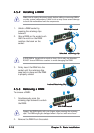
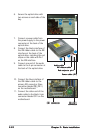
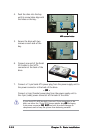
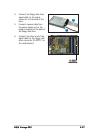
To install a Serial ATA hard disk drive:
1. Remove the knock-down plate
cover using a Phillips screw
driver.
2. Place the chassis upright.
3. With the HDD label side up,
carefully insert the drive into
the 3.5-inch bay.
1
IDE/Serial ATA HDD bayIDE/Serial ATA HDD bay
IDE/Serial ATA HDD bayIDE/Serial ATA HDD bay
IDE/Serial ATA HDD bay
Serial ATA HDD baysSerial ATA HDD bays
Serial ATA HDD baysSerial ATA HDD bays
Serial ATA HDD bays