


4
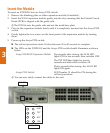
Connect the Ports
Connecting the E1/T1 Ports
To connect a T1/E1 module to a network, use a straight-through RJ-48C-to-RJ-48C cable to
connect the E1/T1 port to an RJ-48C wall jack.
Connecting the Ethernet Port
A UTP Category 5 cable must be connected to the 100Base-TX port, via an RJ45 connector. The
maximum UTP cable length connected to the 10/100 Mbps port operating as 10/100Base-T
is 100 m (328 ft.).
LYou can obtain appropriate cables from your local supplier.
LIf you are connecting the Fast Ethernet port to a PC or workstation, you should use a
crossed cable.
LIf you are connecting the Fast Ethernet port to another switch, you should use a straight
cable.
Connecting the Console Port
Each Avaya X330WAN module has one serial port on the front panel for connecting a terminal,
a terminal emulator, or a modem. The serial port on the front panel is labeled “Console” and
has an RJ-45 socket.
1. Insert the RJ-45 plug on the console cable into the Console port of the Avaya X330WAN
module.
2. Insert the other end into the RJ-45 socket in the supplied DB-9 adapter.
3. Insert the DB-9 plug into the serial (COM) port on the PC or terminal.
L To connect a modem, use the cable and an RJ-45 to DB-25 adapter.
L The cable and two adapters can be found in the Avaya P330 accessory set supplied with
P330 switches, and they are clearly marked.