


INSTALLATION
13
USB Installation
Boot the computer you wish to connect via USB as you would normally
with the keyboard, monitor, and mouse connected directly to the
computer. After the operating system finishes loading, connect the
Switch to the USB computer using the USB A-to-B cable that is part of
your USB KVM cable. Your computer should recognize your Switch and
automatically install the HID USB driver if it has not already been
installed on your USB computer. Once your computer
finishes installing the USB driver, you can power down
your computer and prepare to connect it to
the Switch.
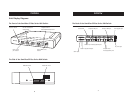
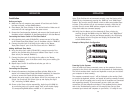
1. Using an OmniView KVM Cable (F3X1962-XX
or F3X1895-XX-GLD), plug in the male VGA
connector to the VGA port on the computer.
Connect the other end (the female connector)
of the VGA cable to the back of the Switch for the appropriate port
you wish to connect to (for example, “VGA 02”).
2. Connect the USB cable’s A-type connector to an available USB port on
your USB computer. Connect the other end of the USB cable (with the
B-type connector) to the corresponding port on the back of the
Switch (for example, “USB 02”).
Note: We recommend you attach the KVM cable directly to a free USB port
on your computer.
Repeat steps 1 and 2 above for each additional USB computer you wish
to connect.
INSTALLATION
12
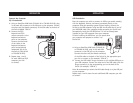
Connect the Computer
PS/2 Installation
1. Using an OmniView KVM Cable (F3X1105-XX or F3X1835-XX-GLD), plug
in the male VGA connector to the VGA port on the computer. Connect
the other end (the female connector) of the VGA cable to the back of
the Switch labeled “VGA 01”.
2. Connect the PS/2
keyboard and PS/2
mouse connectors to the
keyboard and mouse
ports on the computer.
Connect the other ends
of the cables to the
keyboard and mouse
ports located directly
underneath VGA 01 on
the Switch (F3X1105-XX
or F3X1835-XX-GLD).
3. Repeat steps 1 and 2
for each additional PS/2
computer you wish
to connect.